Do you want to install Windows 11 on an Unsupported PC? If so, we’ve got you covered. This article provides effective ways to install Windows 11 on an unsupported PC.
To install Windows 11 on an unsupported PC, try making the PC supported, and to do this, you need to enable TPM 2.0, secure boot, and switch to GPT. If you cannot activate those features on your PC, you must use a few registry hacks to force Windows 11 installation.
It would help if you were informed that Windows 11 has strict system requirements, however, there are ways to go around them.
For instance, it needs at least an 8th-generation Intel, AMD Zen 2, or Qualcomm 7 or 8 Series CPU – but you can perform Windows 11 installation on PCs with old CPUs.
Upgrading an Unsupported PC
Let’s get this clear: If you’re on an edge, we recommend not to upgrade an unsupported PC to Windows 11. Windows 10 will be officially supported with security updates till October 2025.
It’s confirmed that Windows 11 does not have any large features that make it a must to upgrade and Microsoft warns that an unsupported PC can experience bugs.
Moreover, Microsoft warns all users that it may soon stop providing security updates for unsupported PCs running under Windows 11 OS.
On the other hand, since you’re interested in running Windows 11 on unsupported hardware, we can help you do that. During the entire process, we recommend that you back up your important data at the initial time.
It’s very relevant to have a backup, particularly, when upgrading to a new operating system, and when the new OS is not officially supported on your hardware device.
How to Know If Your PC is Unsupported
If you want to check if Windows 11 supports your PC, it can be done by downloading and running Microsoft’s PC Health Check App.
Then, if your PC is supported, upgrading to Windows 11 won’t stress you. You can do it with just a few clicks.
But, if Windows 11 does not support your PC, the PC Health Check will say it “doesn’t currently meet Windows 11 system requirements” and give you reasons.
If the tool reports your PC is unsupported, the process you need to follow will be based on the problem it reports. You may need to just change a setting in your PC’s UEFI firmware, which is the modern replacement for BIOS to make your PC supported.
How to Enable/Activate TPM 2.0
Windows 11 officially needs TPM 2.0. But, there’s a simple way to install Windows 11 if your PC only has TPM 1.2, let’s find out below.
If the tool reports that your PC does not have TPM, there’s a chance your PC does have TPM, but it may be disabled by default.
To check and activate TPM 2.0, you must enter your PC’s UEFI firmware settings (the modern replacement for the BIOS). Search for an option named something like “TPM”, “Intel PTT”, “AMD PSP fTPM”, or “Security Device”.
You could find it in the major UEFI settings menu or in a menu named something like “Advanced”, “Trusted Computing,” or “Security“.
For further info, run an online search for the model name of your PC and enable TPM, or examine its official documentation. If you built your PC, search for your motherboard model name instead.).
Also, you may need to install the UEFI update for your PC or its motherboard. Manufacturers have been rolling out updates that either allow TPM 2.0 by default or add support.
It may be possible to upgrade from TPM 1.2 to 2.0 with a firmware update on some PCs; this depends on your hardware and system manufacturer. Contact your PC’s Manufacturer for more information about Windows 11 updates.
Once you’ve enabled TPM, re-run the PC Health Check Tool. Then, you can now upgrade usually if that is the only issue.
How to Enable Secure Boot
If the PC Health Check reports that your PC is not using Secure Boot, you should check firmware settings for a Secure Boot option and allow it, if possible.
You may have disabled the Secure Boot to install Linux, or it may have become disabled on your motherboard. Modern Linux distributions like Ubuntu and Fedora work on PCs with Secure Boot enabled, therefore, you don’t need to disable this security feature to install Linux.
Once you’re able to activate Secure Boot, re-run the PC Health Check tool. Then you can upgrade normally since Secure Boot might only be the problem.
How to Fix No UEFI (MBR Rather than GPT)
You should know that Windows 11 needs UEFI. Some ancient PCs offer both modes: UEFI firmware or traditional legacy BIOS.
If you’re using a traditional MBR partitioning setup today, but your PC offers UEFI as an option, then you have to switch to a GPT partition table to use UEFI.
There are many ways you can do this. Microsoft’s MBR2GPT tool, enables you to convert a drive from MBR to GPT format.
Microsoft warns users that they should only do this if they know their PC supports UEFI, and that they may need to change settings in their PC’s firmware to ensure that it boots in UEFI mode instead of legacy BIOS mode later on.
If this is the only issue, one simpler way would be to carry out a neat installation. First, make sure to back up your files. Then use Microsoft’s Media Creation Tool to create bootable Windows 11 installation media on a USB drive or DVD.
Now use the installation media to carry out a neat Windows 11 installation, clearing your drive, which you must have transferred your PC’s firmware into UEFI mode first. Windows 11 will clear your Windows 10 system and set up your drive in GPT mode.
Registry Hack for Unsupported CPUs or Only TPM 1.2
If the main issue is that your PC has an unsupported CPU or it has only TPM 1.2 instead of TPM 2.0, that is the easiest issue to solve. It’s your choice, you can solve this restriction issue with a simple Windows Registry change.
Making this change will make Windows 11 ignore the CPU version, check, and install even though if it’s only the TPM 1.2 is present. On the other hand, this would not remove other checks, for instance, if your PC does not have a TPM at all, this registry change won’t allow you to upgrade.
Note: The Windows Registry is complicated, you should be very careful what you add, edit, or delete in it. You could have issues with your Windows installation.
If you’re not satisfied editing the registry, you may need to avoid upgrading. But, since you follow our instructions here, you won’t have any issues.
To begin, open the Registry Editor. Press Windows + R, type “regedit”, and press Enter, or type “registry” into the Start menu’s search box and click the “Registry Editor” shortcut.
Type the following address into the bar in the Registry Editor window:
HKEY_LOCAL_MACHINE\SYSTEM\Setup\MoSetup
Right-click in the right pane, choose New > DWORD (32-bit) value, and enter the following text as the name:
AllowUpgradesWithUnsupportedTPMOrCPU
Double-click the “AllowUpgradeWithUnsupportedTPMOrCPU” value here, set it to “1″, and click OK.
Do you want to skip the registry-editing process? Download our Enable Unsupported Upgrades registry hack to carry out the change in just a few clicks.
The downloadable zip file has two REG files: The first allows upgrades on unsupported PCs and the second reverts the change.
You just need to double-click the “Enable Unsupported Upgrade.reg” file and agree to add the information to your registry. If you want to undo your change. double-click the Undo file.
The files run in a similar way as the above registry hack – they set the “AllowUpgradesWithUnsupportedTPMOrCPU” value to “1” to enable the unsupported upgrades or “0” to revert to the default settings.
To make sure the changes take effect, reboot your PC before continuing. Now, you have access to download and run the Windows Installation Assistant tool from Microsoft’s website to upgrade your PC to Windows 11, it’s as if it had a supported CPU or TPM 2.0. You just need to agree to a warning first.
Note:
You should be aware that this only does two things, and they are: Making Windows 11 ignore the CPU requirement, and allowing Windows 11 install with TPM 1.2 rather than TPM 2.0.
It would not affect other requirements. For instance, if your computer does not have a TPM at all or has only a legacy BIOS instead of UEFI firmware, this registry won’t be of any help.
PCs With No TPM, No UEFI, Other Major Issues
If the tips given above and the registry hack do not help your PC, now things will get a little bit tricky. If your PC does not have a TPM at all it’s unsupported. What does that mean?
It means that Microsoft offers an official way to install Windows 11 with older CPUs and TPM 1.2 chips, for instance, you just have to flip a registry setting, and it’s unsupported, but Microsoft helps you to do it.
There are ways you can install Windows 11 even if you don’t have TPM 1.2, UEFI, or even meet other requirements for Windows 11.
But this is not supported, moreover, you are at more risk of encountering bugs and not getting upcoming security updates if you hack your way around the level of requirements.
We’ve also seen combined results of people successfully following these tricks. Even if it works for you, future updates may result in your PC’s blue-screening, breaking the operating system, and forcing you to reinstall Windows 10.
But, if you’re going to do it, you can use Rufus to create an installer for Windows 11 that ignores the entire usual requirements. Also, you can apply registry edits during the manual installation process if you would do that instead.
We recommend that you ignore any of these extreme tricks because you’re setting yourself up for trouble later on. Windows 10 will operate fine till October 2025, and then you’ll request a new PC by then if you find your PC old for TPM 1.2.
What Happens After the Last Windows 10 Security Update
When the last security update was issued, it was strongly recommended that users don’t use their PCs on the internet. You’ll be exposed to new types of malware, viruses, and other threats from the internet, and there’ll be no real security patches to guide you.
Fortunately, you have the option to pay for updates as part of Microsoft’s Extended Security Updates (ESU) program, but that’s an expensive proposition. For businesses, it costs about $61 per device for the year, and the price doubles every year.
Microsoft is yet to reveal the pricing of these updates for individual users, however, if you’re one of an educational institution, the pricing is $1 per device per year, which goes up to $4 per year by the third year.
If the pricing of ESU for home users is good, it may as well be a good idea to stick with Windows 10. But, if you have a working Windows 10 license, the upgrade to Windows 11 is free and it comes with free security updates for years to come.
How to Easily Upgrade Your Unsupported PC to Windows 11
Before moving forward with upgrades, make sure that you back up your PC. You would not like to lose your data during the upgrade, so please, make sure you back up data that can’t be replaced.
Once you’re done with all of this, then you can begin the upgrade process. You should first download a Windows 11 ISO from Microsft’s Website. On the page, go down to Download Windows 11 Disk Image (ISO) for x64 devices.
Then choose the edition from the drop-down menu, and click Download Now. Follow the prompts till you get the option to click 64-bit Download. The ISO file is over 6GB and it’ll take a short time to download.
While at it, you should download Rufus, which is a free tool that allows you to create bootable USB drives. Also, we think you will need a USB drive with at least 8GB of free space.
Once you have any of these, take a while to back any important files on this drive because they will be erased instantly once the process starts.
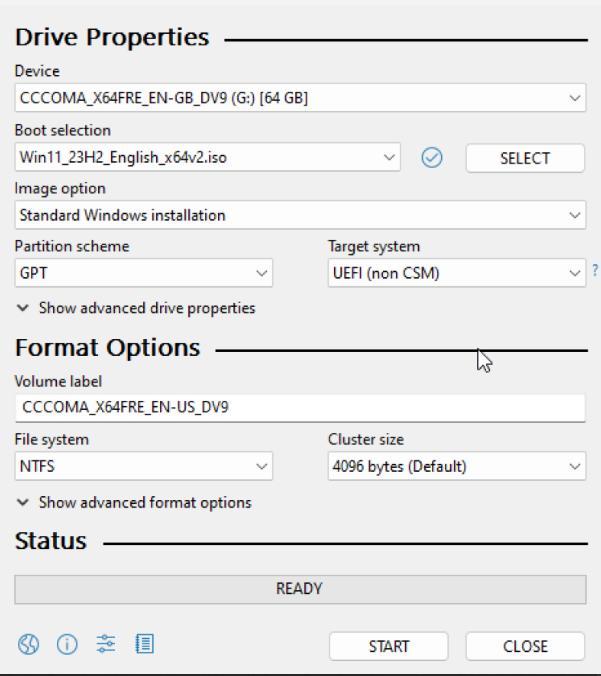
Once Windows 11 ISO is downloaded, insert it into the USB drive, and install and launch Rufus. Access the app, go to the Device drop-down menu, and choose the correct USB drive.
Click the SELECT button next to Disk or ISO image and pic the Windows 11 ISO that you just downloaded. Then, click the START button.
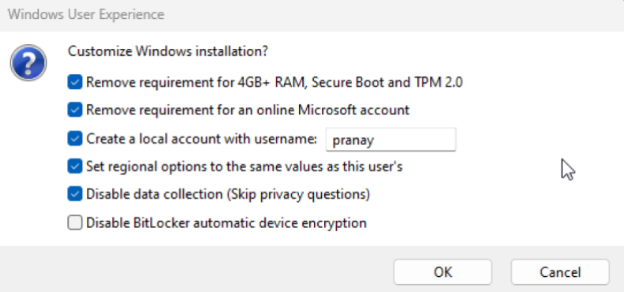
There, you’ll see a pop-up requesting if you want to customize your Windows Installation. This is where you should enable the following options:
- Remove the requirement for 4GB+ RAM, Secure Boot, and TPM 2.0
- Remove the requirement for an online Microsoft account
- Create a local account with a username
- Disable data collection (Skip privacy questions)
The initial option is crucial if you want to install Windows 11 on unsupported PCs.
The rest are okay to have because they allow you to skip the online account sign-in process that Microsoft keeps trying to push, and also skip some annoying setup queries about data collection.
With all this chosen, click OK and then, wait for Rufus to do the rest. After it’s done, re-check if your data is backed up, and it’s time to begin the upgrade.
On your Windows 10 PC, go to Settings > Update & Security > Recovery and click Restart now below the advanced startup section. This will restart your PC and start the Windows 11 setup process from your USB drive.
This method has been tested and approved by us, it’s been used to successfully upgrade PCs to Windows 11 and ran into just one issue. When the PC reboots for the first time during the upgrade, you should remove all USB drives from the PC.
If you don’t do so, the PC installation may get stuck during the process. Other than this, the upgrade goes smoothly and now PCs are running Windows 11.