
Here at Dailybinaryhub, we teach you how to update your computer BIOS (Basic Input Output System) firmware for a Windows computer. Note that your Bios do not commonly need updating, and updating your BIOS incorrectly could render your PC inoperable.
If you operate with a Windows 10 or 11 PC, your computer may be able to update your BIOS automatically. MAC computers basically use a different type of firmware that automatically updates once you update your OS.
What You Should Know
- Most recent computers manufactured in the last few years have different firmware varieties, including UEFI, but the update procedure is the same.
- Use the System Information utility to look for your precise model name and current BIOS or UEFI version before installing an update.
- Only download BIOS updates directly from the manufacturer.
- Plug your PC desktop or laptop into a reliable power source before you start. If you lose power, you will damage the BIOS.
Here are two methods you can either apply when updating your computer BIOS.
Method 1: Download the BIOS Update File
Follow this guide to learn how to update your computer BIOS:
1. Open Start. Click the Windows logo at the bottom-left corner of the screen.
- You can alternatively press the Win key to access the Start Menu.
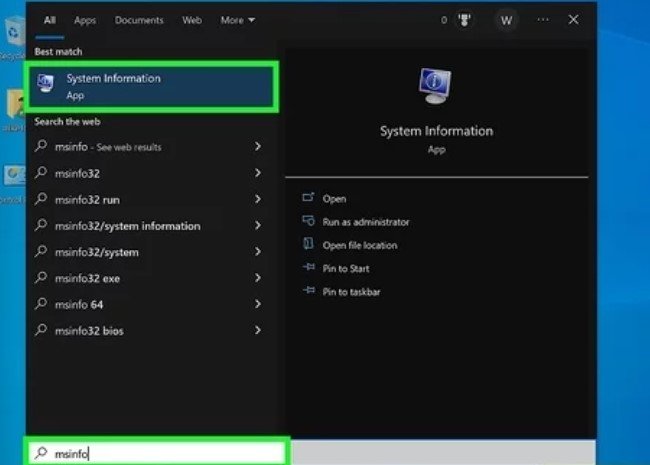
2. Open System Information. Enter msinfo into the Start window, then click System Information at the top of the Start window.
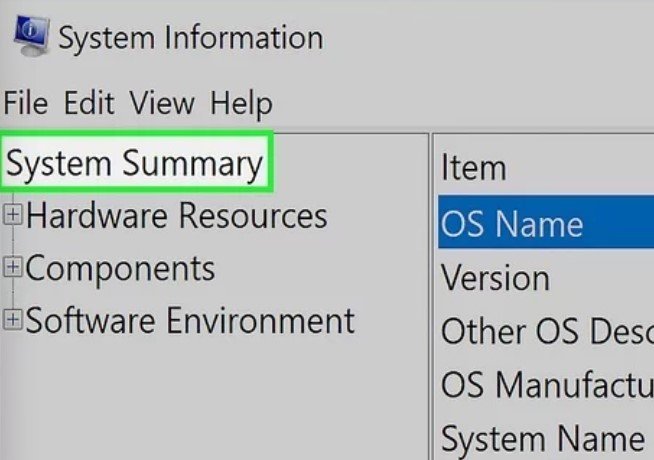
3. Click System Summary. In the System Information section, click the System Summary header on the left side of the window.
4. Check your PC’s model name. Close to the “System Model” heading, you’ll see a list of numbers and letters; this is your PC’s model name. You’ll need this information if you search for the BIOS update file.
- If you have a custom-built PC, skip this step, and check out the following step.
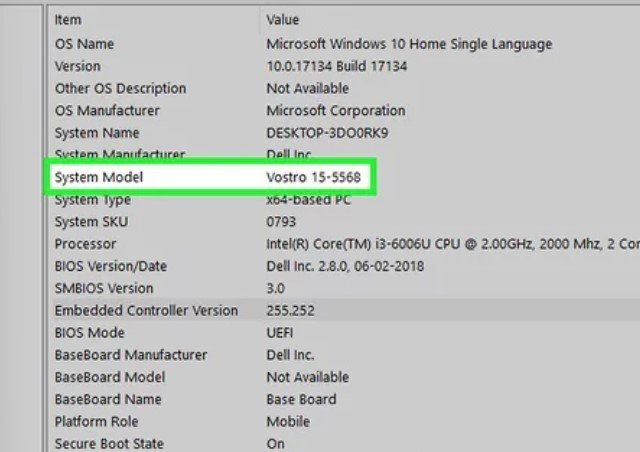
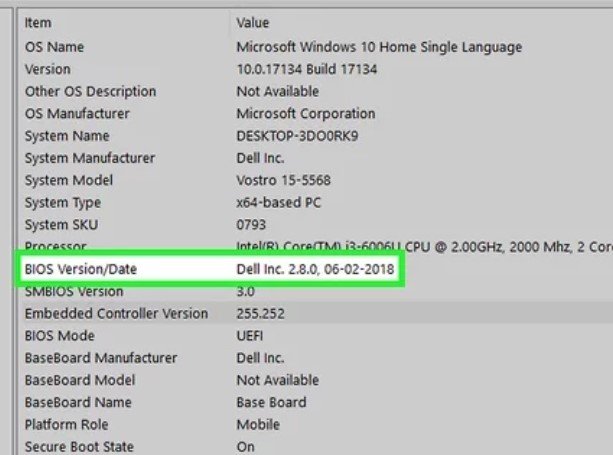
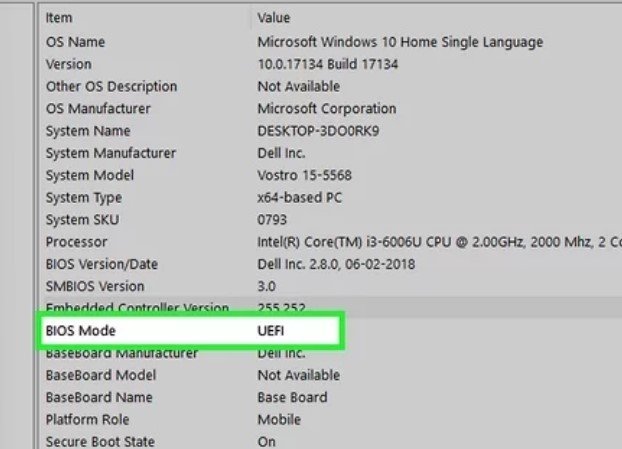
5. Find your BIOS version number. Scroll down the menu. Next, go to the “BIOS Version/Date” heading, there, you’ll find a company name, your computer’s model name, and a number after a period. The number after the period is your BIOS version.
- For a PC with the model number “Q553UB” and a BIOS set to version 202, you would see “Q553UB” here.
- If you’re using a custom-built computer, you’ll need to find your motherboard’s model instead of using the PC’s model number.
- Also, you can find the BIOS with the command prompt by typing in the command wmic bios to get the version.
6. Check the BIOS Mode line to see if you have BIOS or UEFI. A few lines under the BIOS Version/Date header, check out the BIOS Mode line. This will tell you whether you have a true BIOS or a UEFI.
7. Open your BIOS manufacturer’s Support Site. Generally, the easiest way to do this is by entering your computer’s manufacturer name, model name, and “drivers” or “BIOS” into Google and then selecting the appropriate link.
This process will vary depending on your computer’s manufacturer, so you may have to click through another link before you find the correct one.
- If you’re using a custom-built computer, you’ll need to look up your computer’s motherboard name along with “BIOS” or “UEFI” and “update”, and then open the manufacturer’s website.

8. Find the BIOS Update file. Depending on the website, you may have to open the “Update”, “Support“, or “Downloads” section first, or click a “BIOS” heading. Once you’ve found the BIOS file, you can proceed.
- Again, this might involve some trial and error.
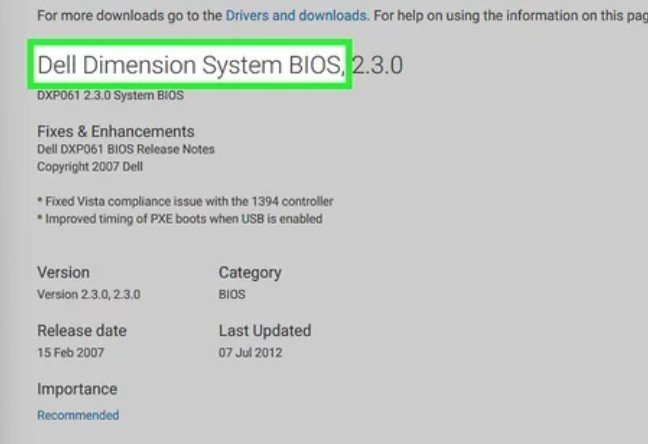
9. Make sure the update file is newer than your BIOS version. In the file’s name, you should see a version number. If this version number is higher than your BIOS version number, your BIOS is outdated and thus can be updated.
- If the version number on the website is similar to your BIOS version number your BIOS is up-to-date, and does not need updating.
- Even if your current BIOS version is a whole number (e.g., 301), and the file on the site is listed as a higher decimal (e.g., 301.1), the site’s file is a higher version than your BIOS uses.

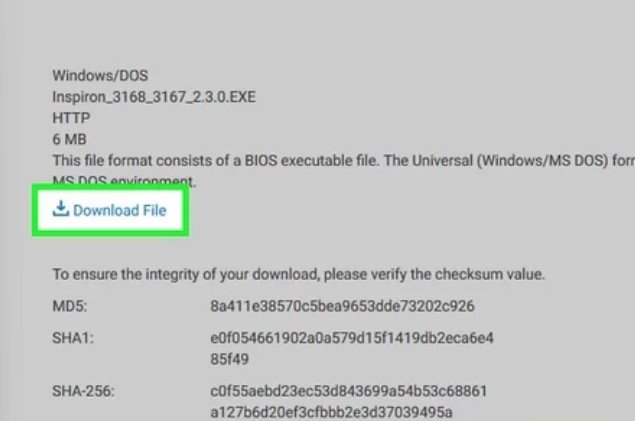
10. Download the update file. Click the Download link, button, or icon to do so. After downloading your BIOS update file, you can then proceed with updating your BIOS.
Method 2: Updating Your BIOS
1. Ensure that your PC is plugged into a reliable power source. Since it’s possible to permanently ruin your BIOS if your PC turns itself off during the update process, you’ll want to use a reliable power source.
- If you’re using a laptop, your PC’s battery should be fully charged and the laptop should be plugged in.
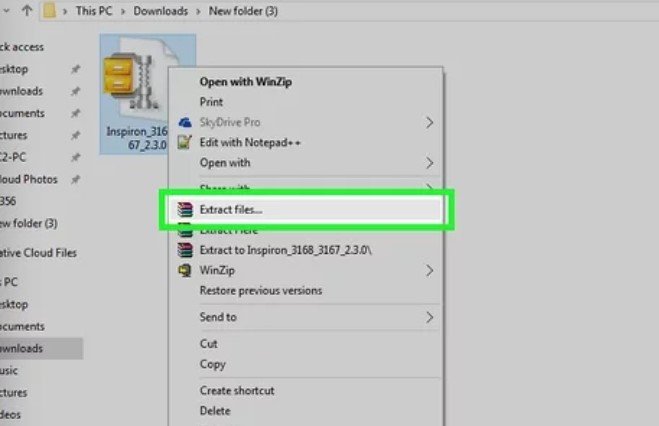
2. Extract your BIOS File. In most cases, you need to extract (or “unzip“) the BIOS update file from within its folder, here’s how to do that:
- Double-click the downloaded ZIP file to open it.
- Click the Extract tab at the top of the window.
- Click Extract all.
- Then click Extract when prompted
- Wait for the extracted folder to open.
3. Read your BIOS file’s README document if applicable. If a text document known as README or similar is available, click it open, and read the entire document before moving to the next level.
- If the README file’s instructions for updating your BIOS do not support the instructions in the rest of this article, ensure that you follow README’s instructions.
- For some custom-made- computers, you may need to run the BIOS installer from a USB flash drive rather than directly from the PC’s hard drive. On the contrary, this is not necessary for most modern PCs. Check the README file to find out more.
4. Access the BIOS page. Prompt your PC to restart by clicking Start, clicking Start.
Click the Power button, click to restart, then instantly begin the process, press the key using your PC’s manufacturer assigned to the BIOS startup. If the BIOS does not launch, you must restart and try a different key.
- For most PCs, this key is one of the function keys (e.g., F12), even though some PCs use the Del key or the Esc key.
- If you don’t know your computer’s BIOS key, check it out by trying your PC’s manufacturer name, model name, and “BIOS key” in a search engine.
- In Windows 10 or 11, you can also access the BIOS settings from the Settings menu. From Settings, go to Update & Security > Recovery > Restart Now (under Advanced Startup). In the window that pops up, select Troubleshoot > Advanced options > UEFI Firmware Settings > Restart.
5. Back up your BIOS if possible. If you see a “Backup” or “Save” option on the BIOS’ main screen (or if you see a Backup tab at the top of the screen), choose it and follow any on-screen instructions.
This will make sure that you can restore your BIOS settings later if your BIOS update does not pair well with your PC.
- You may be prompted instead to back up your BIOS once you initiate the backup process.
- Not all BIOS pages give you access to back up their settings.
6. Enable and use your BIOS update tool. Each BIOS will have a slightly different method of accessing the BIOS update tool, therefore, you have to reach out to your BIOS manufacturer’s support site for a direct detailing of how to do so.
- In other cases, you’ll choose the BOOT tab, make sure that your USB flash drive shows up, enable any backup or “Flash” feature in the menu, and then choose the Start Flash option from the Advanced tab.
- At times, pressing the BIOS key when the USB drive is plugged in will bring forth a unique menu that enables you to choose an Update option, and follow the on-screen instructions. This is commonly found on Dell PCs.
7. Allow your PC’s BIOS to Update. This procedure could take more minutes, close to an hour based on your PC and the depth of the BIOS update. Once your BIOS is finished updating, then your PC should restart itself, even though you may be prompted to verify this decision.
- Do not turn off your PC when updating the BIOS. When you do this, it causes the BIOS to become corrupted, which means that your PC will be unable to start, complete the BIOS installation, or operate at all.
BIOS Overview
BIOS also called System Setup is an acronym for Basic Input or Output System. Currently, modern Dell PCs come with a Unified Extensible Firmware Interface (UEFI). BIOS or UEFI is firmware that is embedded in a small memory chip on the PC’s system board.
It serves as an interface between the PC’s hardware and the operating system. The BIOS or UEFI activates all the basic hardware that is needed to boot the operating system when the PC is powered on. This includes the following, but is not limited to:
- Chipset
- Processor and cache
- System memory or RAM
- Video and audio controllers
- Keyboard and mouse
- Internal disk drives
- Network controllers
- Internal expansion cards
To access the BIOS or System Setup on Dell PCs, follow these procedures below:
- Press the F2 key many times at the Dell logo screen during startup.
- Or, rather, press the F12 key many times at the Dell logo screen during startup, and choose BIOS Setup or System Setup from the menu.
Note: The BIOS or UEFI interface can be different between different Dell PCs. To learn how you can navigate the different settings available in the BISO or UEFI, see the documentation of your Dell PC here.
❗ WARNING: The BIOS or UEFI interface is programmed & designed for advanced computer users. Changing some settings could prevent the computer from completing the power-on self-test (POST), and prevent the OS from loading, or a potential loss of data.
How to Update the BIOS or UEFI on a Dell Computer
Dell Tech recommends updating the BIOS or UEFI as part of your scheduled update cycle. BIOS or UEFI updates can often fix problems, add features, or both to the BIOS.
BIOS update has feature changes that assist in keeping the system software current and compatible with the other PC modules (hardware, firmware, drivers, and software).
BIOS update also offers security updates and increased stability. Dell offers you an easy-to-use self-installing BIOS update utility. Critical BIOS updates are also pushed through Windows Update.
❗ WARNING: Make sure to back up your data before attempting to update the BIOS. Errors while updating a BIOS may result in potential data loss.
❗ WARNING: You should disconnect devices like external USB drives, printers, and scanners before updating the BIOS on your PC.
❗ WARNING: Dell PC battery must be charged to at least 10% before you begin updating the BIOS. Dell Technologies recommends that your laptop be on AC power before you proceed with the update process.
⛔ CAUTION: Disable BitLocker before taking action on the Dell computer. If BitLocker is not suspended, the next time you restart your PC it won’t recognize the BitLocker key.
Also, you’re prompted to enter the recovery key to progress, and the PC requests for the recovery key whenever you reboot the PC. If the recovery key is not known, this can result in data loss or unnecessary OS reinstallation.
Note: You must be logged in as an administrator to install the BIOS update on your Dell PC.
Note: Also, you should be logged in as an administrator to download and install the SupportAssist app on your Dell PC.
Note: Simply update the BIOS version, if the BIOS version that is installed on your PC is outdated by more than two versions. It avoids compatibility issues. Click here, and learn how to check the BIOS version on your Dell PC.
Before you start, temporarily disable BitLocker protection in Windows. BitLocker protection will resume automatically once the computer has restarted.
1. Go to https://www.dell.com/support/drivers.
2. Identify your Dell computer.
- Click Download and Install SupportAssist to auto-detect your Dell PC. Follow the on-screen instructions to install Dell SupportAssist.
- Or, enter the Service Tag, Express Service Code, or the Serial number of the Dell PC and click Search.
- Or, click Browse all products to manually select your Dell PC from the catalog.
3. Select the Operating System that is installed on the PC.
4. Under Category, select BIOS.
5. Locate the latest System BIOS.
6. Click Download and save the file to your PC.
7. Using File Explorer (also known as Windows Explorer), browse to the location where the downloaded file was saved.
8. Click twice on the downloaded BIOS setup file and follow the on-screen instructions to complete the installation process.
9. The PC restarts and completes the BIOS update process.
How to Identify the BIOS Version on a Dell Computer
To identify the BIOS version with the use of System Information in Microsoft Windows:
- Press the Windows + R key on the keyboard.
- In the Run dialog box, type msinfo32 and press the Enter key.
- In the System Information window, search for “BIOS Version/Date” (Figure 2).
To identify the BIOS version using Command Prompt in Microsoft Windows:
- Press the Windows + R key on the keyboard.
- In the Run dialog box cmd and press the Enter key.
- In the Command Prompt window, look for “BIOS Version” (Figure 3).
To identify the BIOS version with the use of the BIOS interface.
- Restart your PC.
- Press the F2 key on the Dell logo screen during the startup.
- Below the Main or System Information tab, look for the BIOS version.
How to Recover a Corrupt BIOS on my Dell PC or Tab
A corrupt BIOS seems to be one of the causes of your PC being unable to complete POST or even boot into the OS sometimes. BIOS Recovery tool is a software that is designed to recover a corrupted BIOS based on Boot Block Technology.
The software’s major feature is to offer flexibility to recover the corrupted BIOS. It uses a BIOS recovery file from the computer’s primary hard disk drive or an external USB drive.
How to Reset the BIOS Password
The BIOS or UEFI firmware offers the ability to set lower-level passwords. This allows you to restrict users from booting the PC, booting a removable USB device, and changing the BIOS or UEFI settings without permission.
Three types of passwords can be set in the BIOS or UEFI firmware settings:
- Supervisor or Admin Password: The admin password enables several security features. Allowing these settings restricts users from changing the BIOS or UEFI firmware settings.
- User or System Password: This setting restricts users from completing the power on self-test (POST) process without the correct password.
- Hard drive password: This option restricts a user from accessing the internal hard drive without the correct password.
How to Update the BIOS using the Windows Update
The BIOS or UEFI firmware offers the ability to set lower-level passwords. This enables you to restrict a user from booting the PC, booting to a removable USB device, and changing the BIOS or UEFI settings without permission.
You can run the Microsoft Windows update search and check if it is listing the latest Dell BIOS:
- After your computer has booted into the OS, open the settings application. Click Windows Update.
- Pressing the Windows + I keys down simultaneously and then releasing them together is a keyboard shortcut to open the settings.
- Run the update search for new updates.
- Click Advanced Options.
- Click Optional Updates and search for the Dell BIOS in the list of available updates.
- If the BIOS is listed, click the update from the list to begin the installation.
- Follow the on-screen instructions to complete the installation process.
- The PC restarts as part of completing the BIOS update process.
How to Update BIOS in Windows 11
To perform the BIOS update on Windows 11, you’ll want to do it directly. However, there’s no single solution that covers every computer. The updating process is peculiar to specific PCs.
Here are the methods:
1. Check your BIOS Version on Windows 11
- Hit the Windows + R keys together
- Type msinfo32 and hit Enter
- Locate the entry marked BIOS version/date
- Note down this information & close the window.
2. Get your PC’s Serial Number
- Choose the Start menu and type cmd. Select the Command Prompt app.
- Type wmic baseboard, get product, manufacturer version, serial number, and press Enter on the keyboard.
- Note it down
3. Download & Update your BIOS
As said earlier, the upgrading process is specific to the type of computer you use. let’s look at three: Asus, HP, and Lenovo.
If your PC does not fall under these three, you do not need to worry. By the end of this article, you should have a better understanding of how to boot BIOS on Windows 11.
Before you begin the process you should apply the following:
- Close all the open applications
- Temporarily disable your antivirus program
- Also, temporarily disable BitLocker Drive Encryption.
How to Update BIOS on Asus
1. Go to the Asus Download Center, type in your motherboard’s model, and choose it when you see it in the drop-do list.
2. Select Driver & Utility and then Driver & Tools.
3. Choose your OS (we chose Windows 11 in this case).
4. Under Software and Utility, look for ASUS AI Suite 3, and select Download.
5. Scroll back to the top and click the BIOS & FIRMWARE tab.
6. Up next, scroll to the BIOS section and select Download.
7. Extract the ZIP file containing ASUS AI Suite 3, then open AsusSetup.exe and install the program. When finished, reboot your computer.
8. Extract the ZIP file that contains the BIOS folder.
9. Open Asus AI Suite 3, and Choose the Menu icon (the three horizontal lines) on the left side.
10. Select EZ update.
11. Under Manually update boot logo or BIOS, select the Ellipses, and choose the same BIOS file you had extracted earlier.
12. Choose Update in the lower-right corner.
13. Select Flash.
14. Select OK. Restart your PC when you’re done with the process
Why is BIOS so Important
As you may know, BIOS is an acronym for Basic Input Output System, which is software that works with the computer’s motherboard.
This software enables PCs to perform some operations as soon as they come on. It handles the early stage of the startup process, ensuring that the OS is appropriately loaded into memory.
The BIOS plays a role in keeping your PC safe & secure. The boot process can be password-protected in most BIOS software versions, which means you must offer a password before any BIOS action starts.
Because the BIOS carries out all of its duties during startup, the whole system is effectively password-protected.
For more information, guides, and tips, feel free to visit our official platform, and find out more. If you have any inquiries or questions to ask, feel free to leave them in the comment section below, and don’t forget to share this article, it could be helpful to others.
You Should Also Read:
- How to Make a Printer Wireless with a Wireless Router or USB Print Server
- How to Create Wi-Fi Hotspot via the Command Prompt | Fixing No Hosted Network
- How to Block People Off Your Wi-Fi Network Via Wi-Fi Deauthorization Attack
- How to Reset Windows 11 PC to Factory Settings | All You Need to Know