Is your printer old & only usable with a cable? Luckily, you can make your wired printer wireless with the use of a router, and its process is easy! This hub will teach you how to transform a non-wireless printer into a wireless printer by connecting it to a router.
If applying the procedures in today’s guide doesn’t work for your printer, you can attach the printer to an internet-connected computer and share the printer with other computers on your network.
What You Should Know
- Plug your printer’s USB cable into your router’s USB port if it has printer functionality.
- If you don’t have a USB port on your router, you can also make use of a USB-to-ethernet adapter.
- In case you can’t connect your printer to your router, you can also share it on the network from a computer.
There are four basic methods you can apply when making a printer wireless with a wireless router which we will look at in the following section below, careful consider these methods and apply them.
Method 1: Connect to a Router
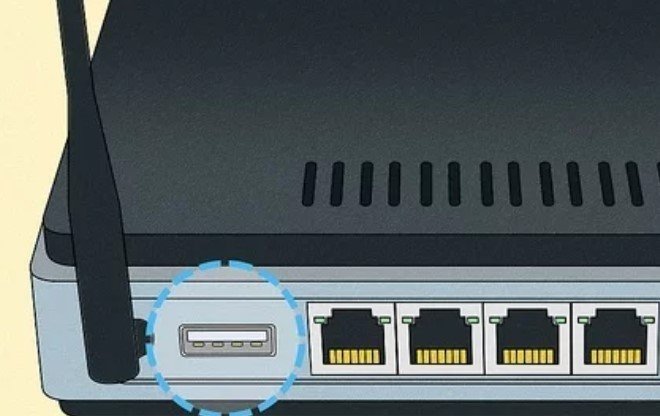
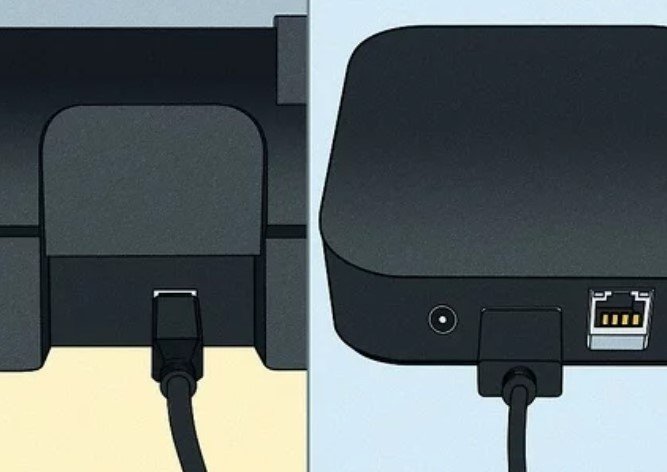
1. You need to check for a USB port on the back of your router. If your router has a USB port on the back, you can easily connect your printer to the router by using the USB cable that came with your printer.
- Not all routers have the needed firmware to allow computers on your network to print, so ensure that your router has the right features (access your router and make sure that Storage is not the only USB option).
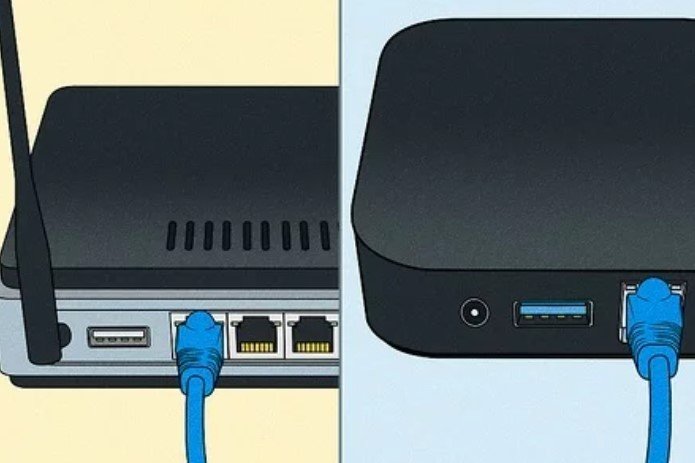
- If your router does not have a USB port, you can either buy another router that does have printer functionality, by an ethernet adapter, or use a computer as a host.
- With an ethernet adapter, you can connect your printer’s USB cable to an ethernet port on the back of your router.
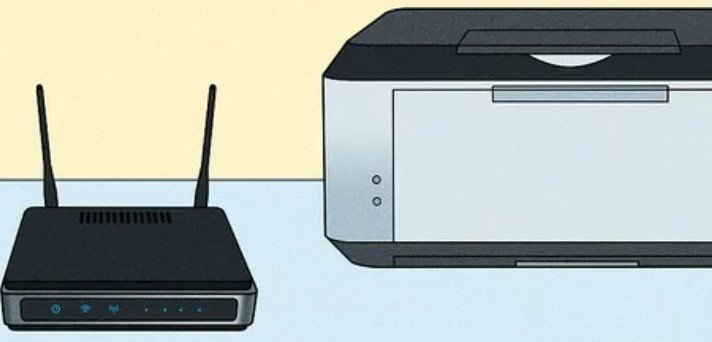
2. Place your printer close to your router. You should keep your printer close enough to your router that you can connect the USB cable without bending any of the cable’s connections.
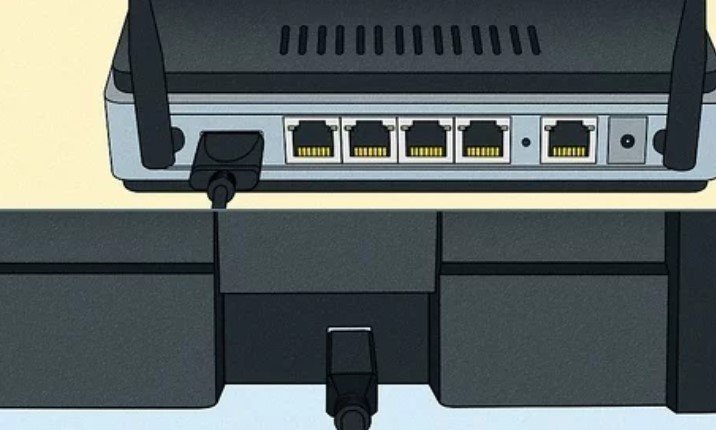
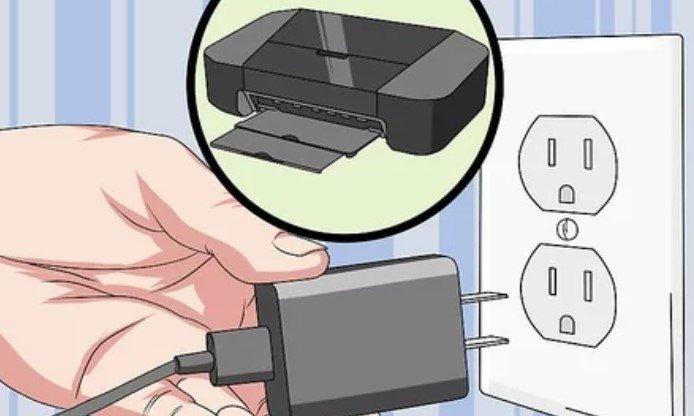
3. Attach your printer to your router. Plug one end of the USB cable into the back of your printer, then plug the other end into the back of your router.
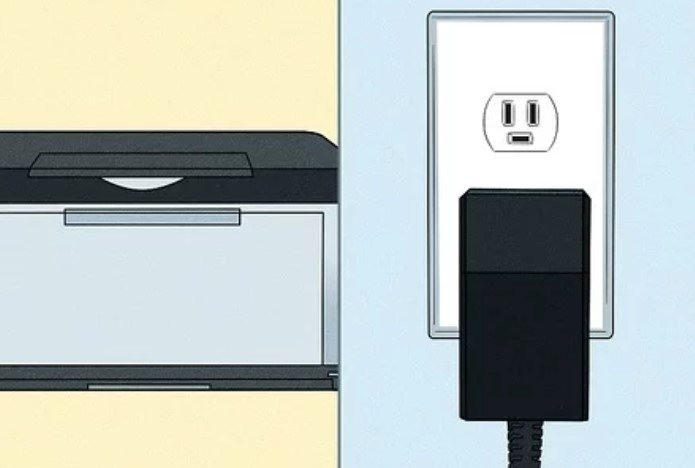
4. Plug your printer into an electrical source. You may need to have an extension cable or power strip to complete this procedure.
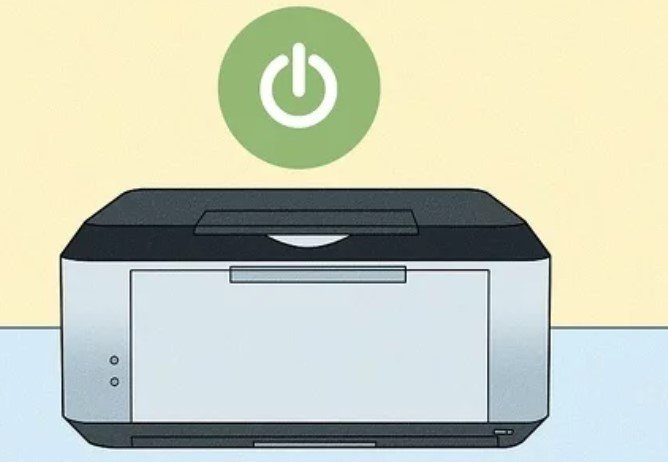
5. Turn on your printer. Press your printer’s Power button to do so.
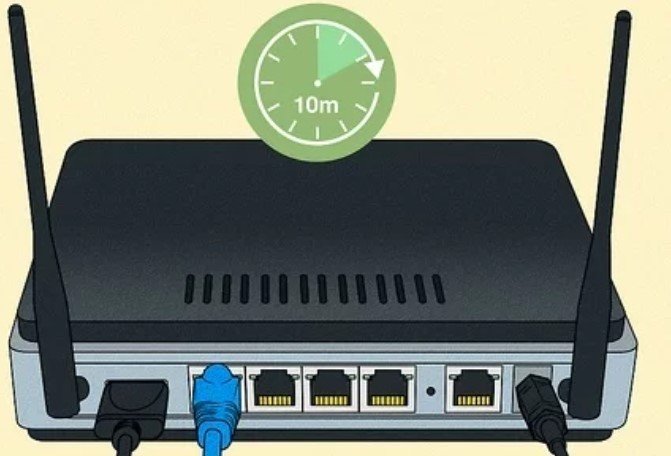
6. Hold for about 10 minutes. This should offer your router enough time to recognize and implement the printer.
- Your internet may slow down for a few minutes while your router installs drivers for the printer.
7. Try connecting to the internet. Ensure that your PC is on the same wireless network as the router into which your printer is plugged, then do one of the following based on your PC’s operating system.
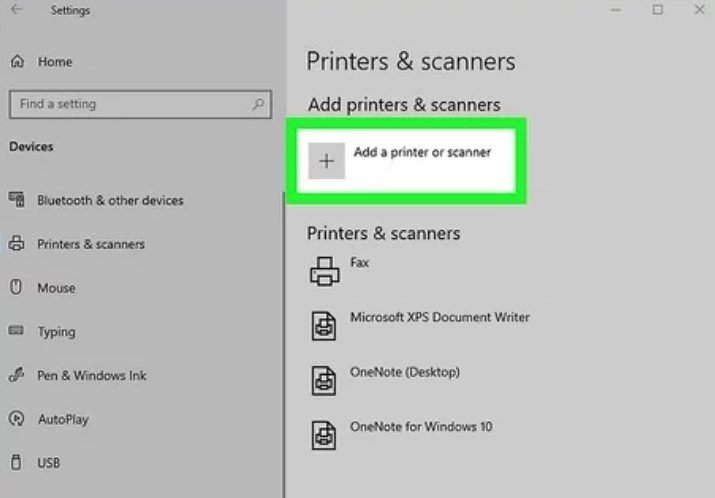
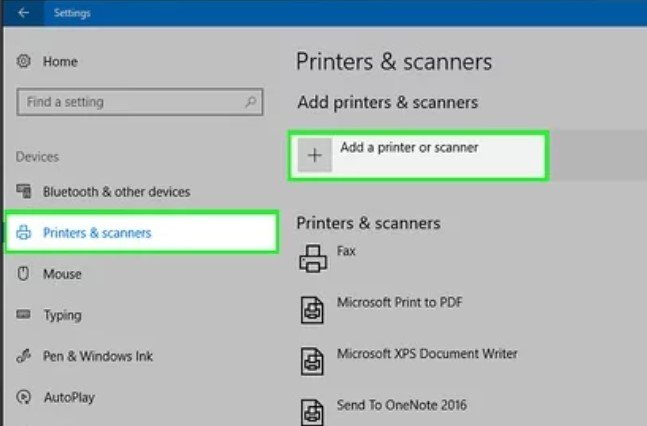
- Windows – Open Start, click on Settings, click Devices, and click Printers & Scanners, select the wireless printer or click Add.
- Mac – Open the Apple menu, click System Settings, click Printers & Scanners, and then select the wireless printer or click Add.
- If you’re not able to connect to your router, try one of the following host computer methods instead.
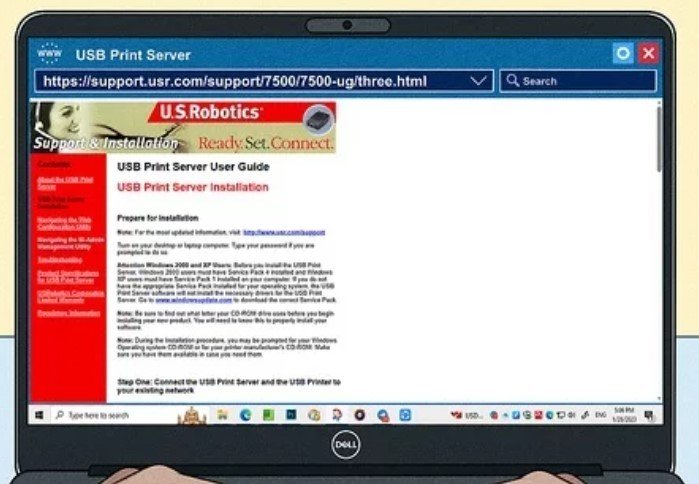
Method 2: Use a USB Print Server
1. Connect the USB Print Server to your Printer. A print server is a device that enables you to connect your printer to give it wireless capability. The print server acts as a bridge between your wireless router and the printer. The USB dongle connects to the USB port on your printer.
- If you cannot connect your printer directly to the router, here is a good alternative.
2. Connect the USB Print Server to your router. Your printer needs to have access to your network in order to work. The way of doing this is based on the model of the print server you’re using, so check the instructions carefully that came with your server.
- Some print servers can connect to a router wirelessly, while others need an ethernet cable to connect.
3. Install the USB Print Server software on your PC. You need to make sure that your PC or any computer that’s going to print using the wireless print server has the required software.
You might be prompted to install the software when you connect to your printer, or you may need to follow the instructions from the USB Print Server’s packaging.
- Once you have the USB Print Server set up and the software on your PC, you can then send print jobs wirelessly!
Method 3: Using a Host Computer on Windows
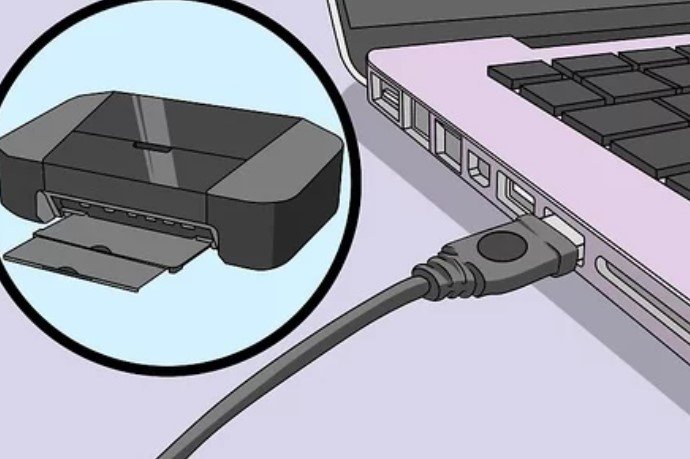
1. Attach your printer to the PC that you want to use as the host. With this method, you could use an internet-connected computer to act as the wireless source for your printer. You should start by plugging your printer into your computer via the printer’s USB cable.
2. Plug your printer into an electrical outlet. You should try selecting an electrical outlet close to your PC to avoid stretching or bending the cord.
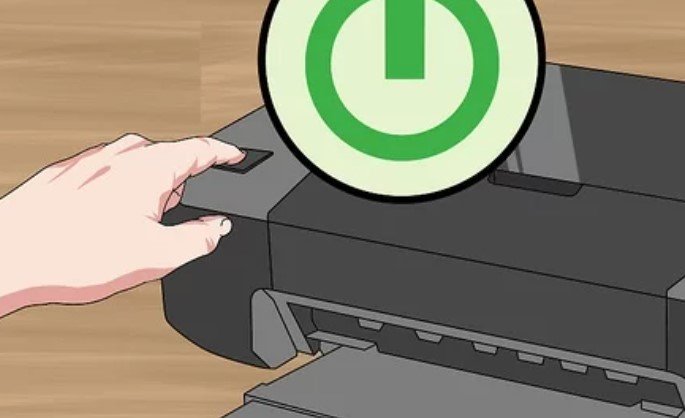
3. Turn on Your Printer. To do so, you need to press the printer’s power button.
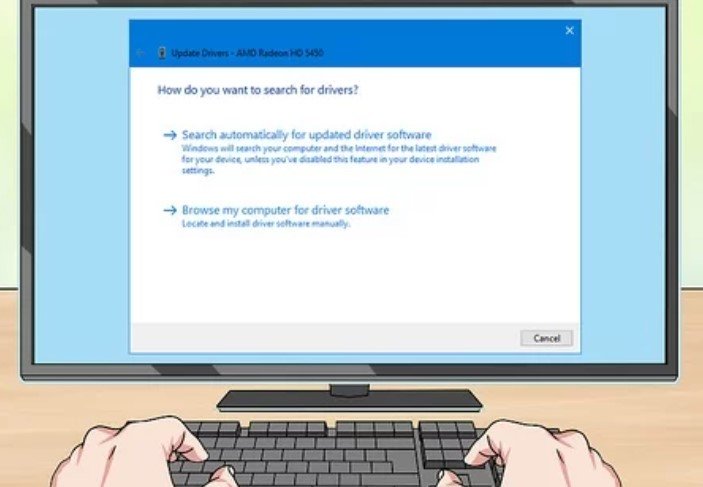
4. Follow any on-screen prompt during the process. If you’re prompted to download new drivers or software, you need to follow the on-screen directions before carrying on with the process.
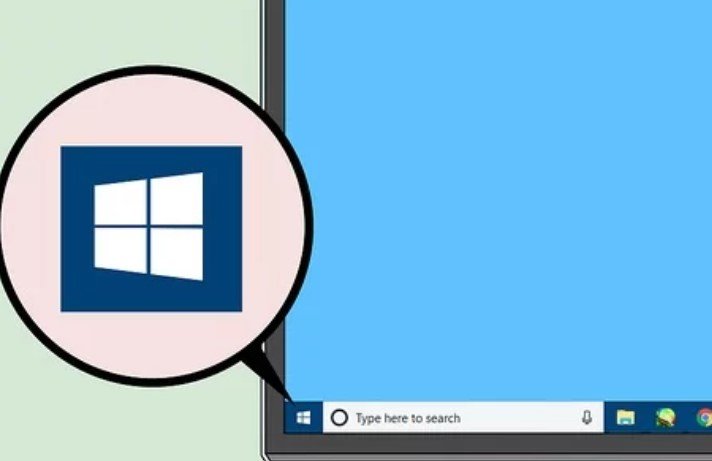
5. Open Start. Click the Windows logo on the bottom-left side of the screen
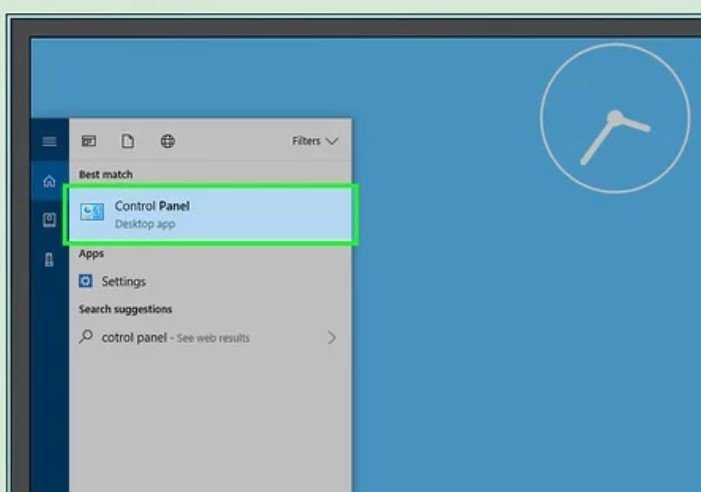
6. Open Control Panel. Enter the control panel in the search section, and click Control Panel when it pops up at the top of the Start menu.
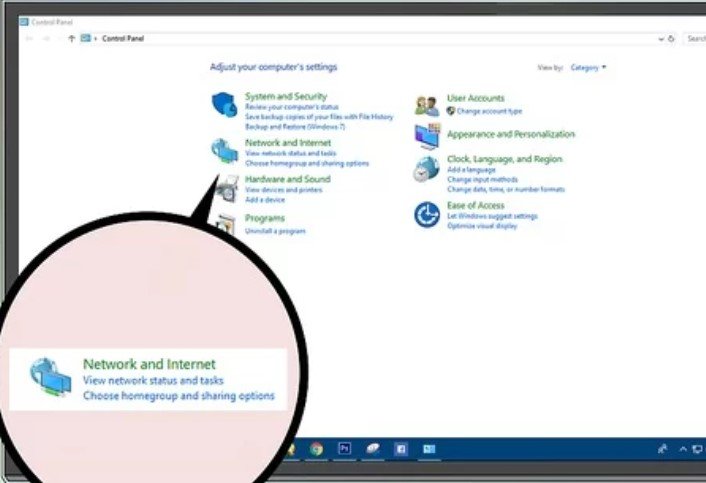
7. Click on the Network and Internet option. You’ll find it as a heading near the top of the page.
- If you happen to see “Small Icons” or “Large Icons” to the right of the “View by” heading at the upper-right side of the window, skip this process.
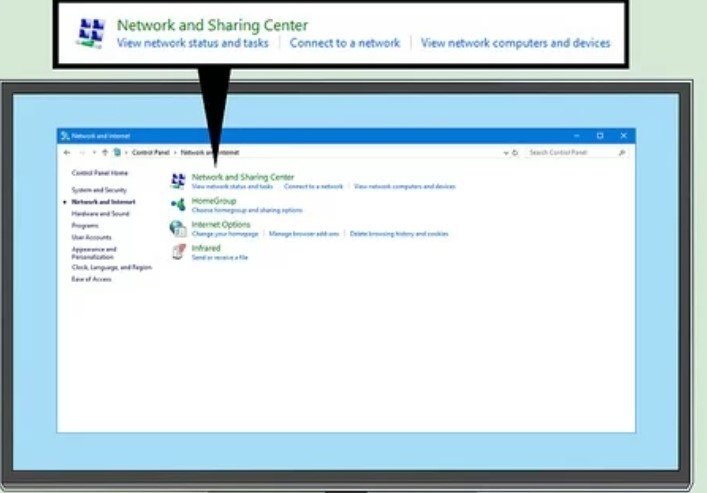
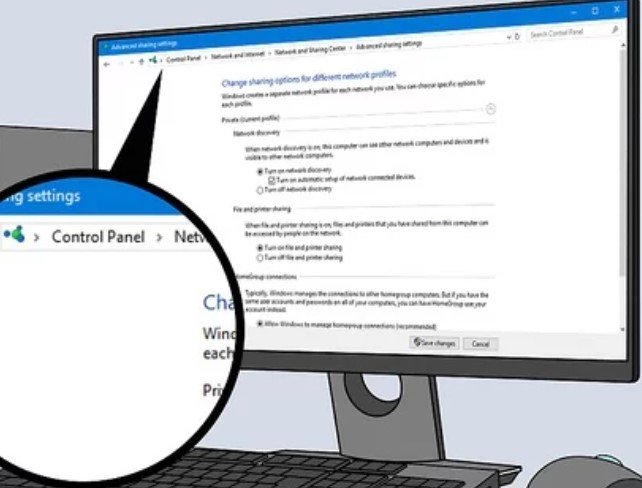
8. Click on the Network and Sharing Center option. There, you’ll find the option at the middle of the page.
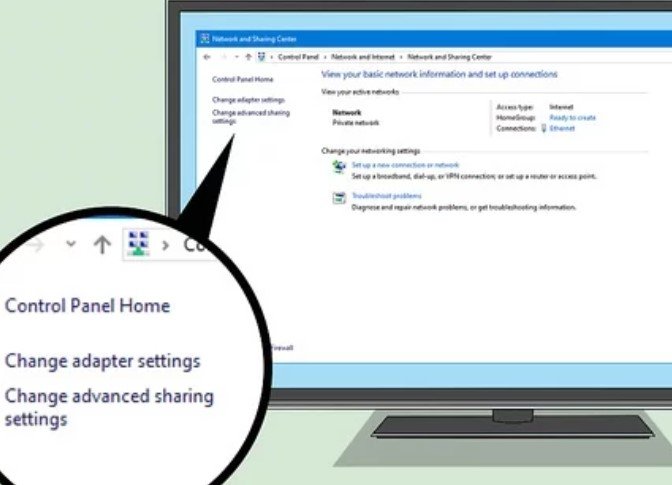
9. Click on the Change advanced sharing settings option. This is a link at the upper-left side of the page.
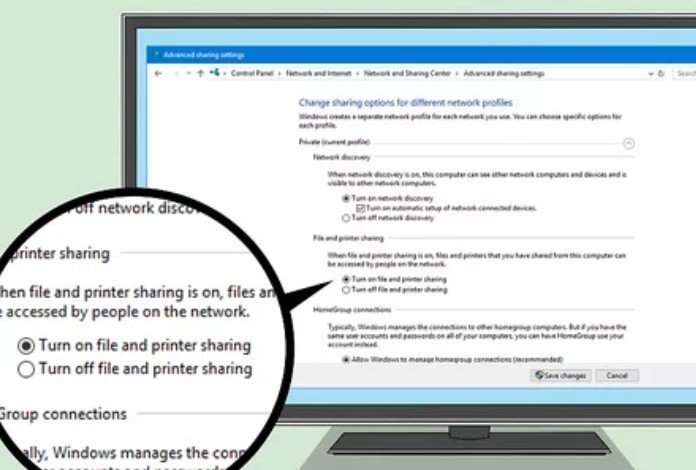
10. Check the “Turn on file and printer sharing” box. There you’ll find this option below the “File and printer sharing” heading.
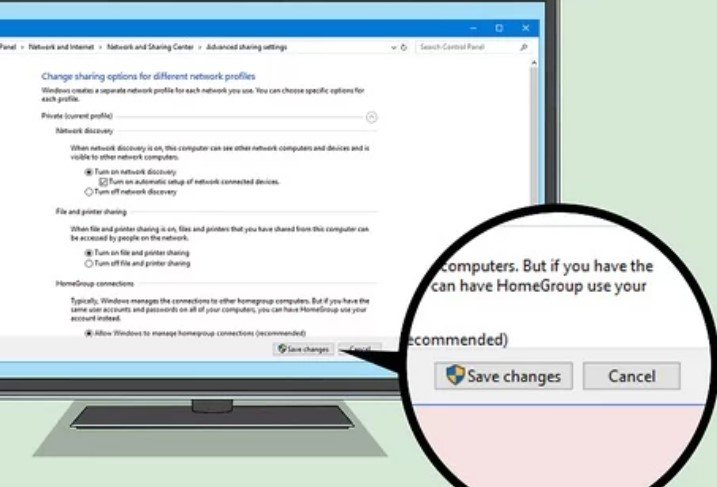
11. Click on the Save Changes option, which is at the bottom of the page.
12. Then click Control Panel. With this, it takes you back to the main Control Panel page.
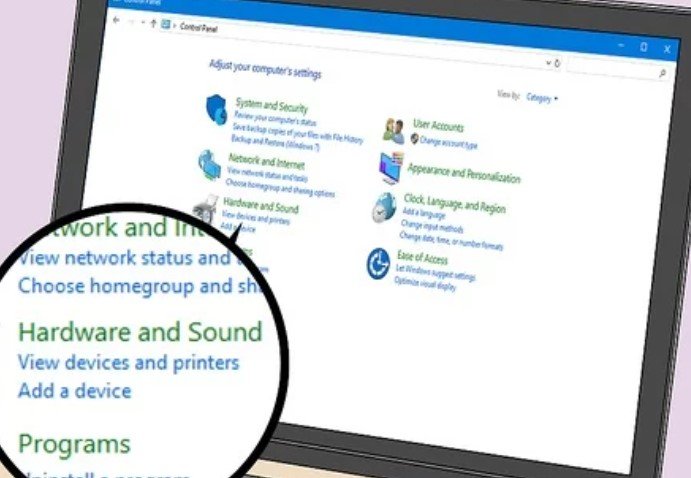
13. Click on the View Devices and Printers option. This is a heading near the button of the page.
- If you’re viewing small or large icons instead, you should click Devices and Printers here.
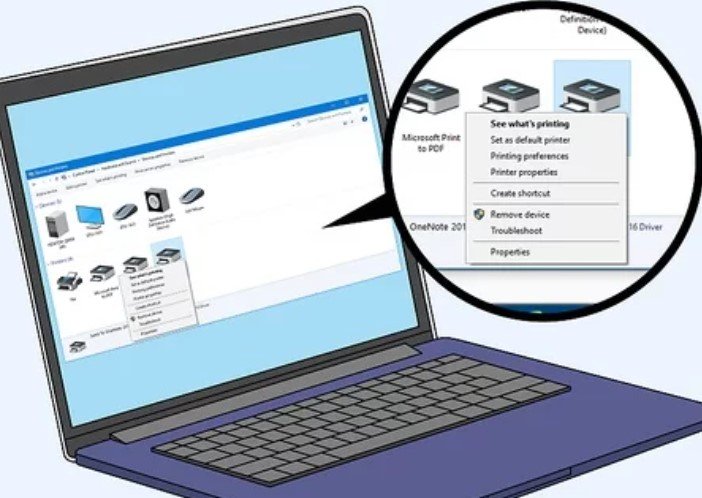
14. Right-click on the connected printer. When you do this, it will prompt a drop-down menu.
- If your mouse does not have a right-click button, click the right side of the mouse, or use double fingers to click the mouse.
- if your PC uses a trackpad instead of a mouse, use two fingers to tap the trackpad or press the bottom right side of the trackpad.
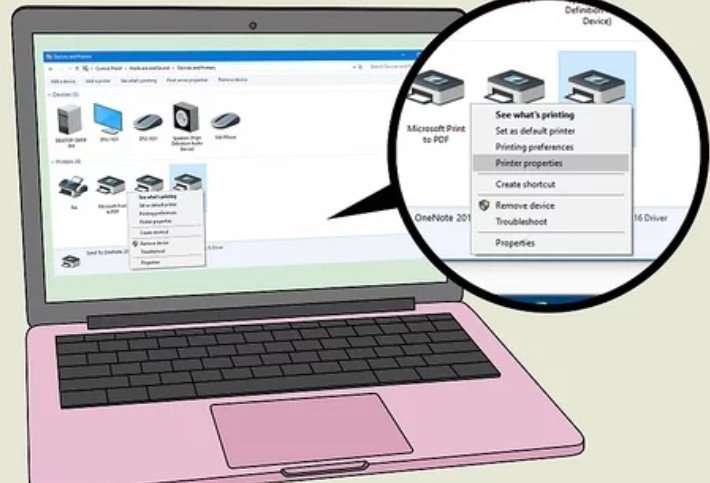
15. Click on the Print Properties option. You can find it near the middle of the drop-down menu. When you click the option a new window opens.
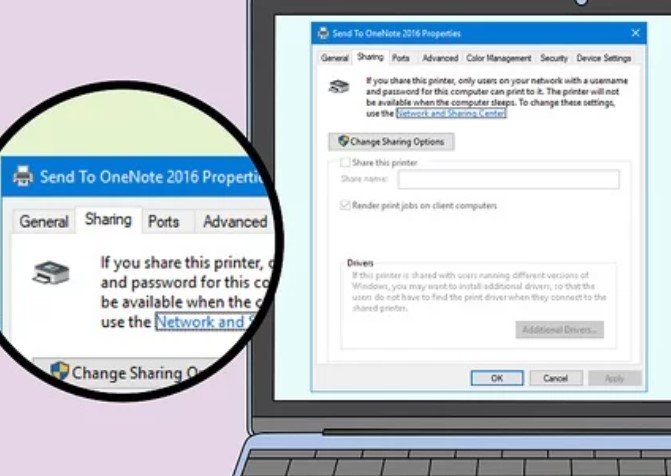
16. Then click on the Sharing tab. You can find it at the top of the new window.
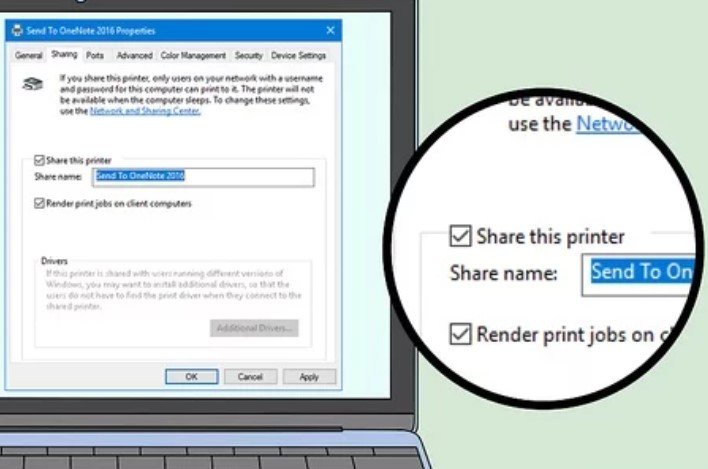
17. You can now share the printer with other PCs on your network. Then check the “Share this printer” box, click Apply, and click OK at the bottom of the window.
18. Try connecting to the internet. Ensure that your PC is on the same wireless network as the router into which your printer is plugged, then do one of the following based on your PC’s operating system.
- Windows – Open Start, click on Settings, click Devices, and click Printers & Scanners, select the wireless printer or click Add.
- Mac – Open the Apple menu, click System Settings, click Printers & Scanners, and then select the wireless printer or click Add.
Method 4: Via a Host Computer on a Mac
1. Connect your printer to the PC that you want to use as the host. This method enables you to use an internet-connected computer to run as the wireless source for your printer. You’ll begin by plugging your printer into your PC via the printer’s USB cable.
- If your Mac does not have a traditional USB 3.0 port, you’ll need a USB 3.0 to USB-C adapter.
2. Insert your printer into an electrical outlet. Then, try selecting an electrical outlet close to your PC to prevent stretching or bending the cord.
3. Turn on Your Printer. To do so, you need to press the printer’s power button.
4. Follow any on-screen prompt during the process. If you’re prompted to download new drivers or software, you need to follow the on-screen directions before carrying on with the process.
5. Open the Apple menu. Click the Apple logo which you’ll find at the top-left side of the screen. Then a drop-down menu will appear.
6. Click on the System settings option. You can find it in the drop-down menu. With this, the System Preferences window opens.
7. Click on the General option. You’ll find this option in the panel on the left side of the window close to a gear icon.
8. And then, click on the Sharing option. This option is in the System Preferences window. Then a new window will appear.
9. Also, check the “Printer Sharing” checkbox and click the icon with an “i“. Enable Printer Sharing, and then you’ll see the circled “i” icon on the right.
10. Choose your Printer. Here, click your connected printer’s name in the Printers section of the window.
- By default, it is shared with “Everyone” on your network. If you need only specific computers to use your printer, click on the plus icon, and select a user from Users & Groups, Network Users & Groups, or maybe someone from your contacts.
11. Try connecting to the internet. Ensure that your PC is on the same wireless network as the router into which your printer is plugged, then do one of the following based on your PC’s operating system.
- Windows – Open Start, click on Settings, click Devices, and click Printers & Scanners, select the wireless printer or click Add.
- Mac – Open the Apple menu, click System Settings, click Printers & Scanners, and then select the wireless printer or click Add.
How to Make Printer Wireless with Bluetooth
You may wonder if there’s a way of making my wireless printer with Bluetooth. Actually, Yes! There is a way of making your non-Bluetooth printer become a Bluetooth printer.
All you just need to do is to find a USB Bluetooth Printer Adapter in electronic stores, it could cost not less than $20. Also, the adapter was designed to be plugged into the printer’s USB Type-A port.
Or rather it could be designed to be plugged into the printer’s USB cable. Here are effective instructions on how to use a USB Bluetooth Printer Adapter:
- Power your PC. Connect the USB Bluetooth printer adapter to your printer’s USB port via the USB cable. Plug the adapter if it has a power card. The power your PC on.
- Enable the Bluetooth on your PC.
Also Read: How to Fix Bluetooth Device Missing from Device Manager | Possible Steps to Apply
For Those Using Windows
- Navigate down to the lower-right side of the screen, and click the Bluetooth icon in the Start menu taskbar
- Then, click On, Enable, Show Bluetooth Devices, or Search for Devices
- After that, your PC will automatically detect the printer. Follow your PC’s prompts while installing the printer. Or you can insert the adapter’s installation CD that’s in your PC’s optical drive and follow its prompts to finish the process.
For Those Using MAC
- Click the Apple icon on the menu bar at the top of your screen.
- Click on the System Preferences option
- Then, click on Bluetooth. Select your printer, and click Connect.
- After that, follow the prompts to install the printer and the USB Bluetooth printer adapter.
Bluetooth is currently available for companies like HP printers as a wireless printing option, see the following Bluetooth printer compatibility lists, and then set up a connection to start printing jobs.
Note: There are two types of printers produced by HP, and they include Bluetooth Smart & Bluetooth Low Energy (BLE), they are used by the HP Smart app to discover the printer during the setup process. Meanwhile, the Bluetooth Smart does not allow Bluetooth printing.
HP Printer With In-built Bluetooth
Some HP printers have an in-built Bluetooth radio that assists in paring devices like mobile phones, computers, or tablets to enable wireless printing.
- You need to turn on the Bluetooth radio on the printer. According to the model, press the Bluetooth button, or go to the Setup or Network menu to access Bluetooth Settings.
- Access the Bluetooth settings on your PC or mobile device, and then confirm that the feature is turned on.
- Choose your printer from the list of found devices, or just follow any steps you could follow to add the as a new device.
- Unbox the item you want to print, open the Print menu, and then choose your desired printer to print the job.
Here are HP printers with in-built Bluetooth:
- Officejet 100 Mobile printer (L411)
- Officejet 150 Mobile All-in-One printer (L511a)
- Photosmart A646 Compact Photo printer
- Photosmart C8180, C8183, C8188 printer
- Photosmart Premium All-in-One printers (C309)
Printer that needs an Adapter for Bluetooth Printing
Printers like HP Deskjet, Officejet, and Photosmart printers, which were released in 2008, and earlier use Bluetooth printing with a differently purchased adapter.
Supported printers and HP Bluetooth adapters such as the bt300 or bt500, are no more available for purchase. But if you have a supported printer but do not have the adapter, you can still get one online via auctions or retail websites.
On the other hand, if you have a compatible adapter, you should insert it into the PictBridge port that’s found on the front side of the printer. Ensure that the HP driver and software are installed, and then pair the printer via the Bluetooth settings on the PC or mobile device.
Here are printers that allow printing over a Bluetooth connection with an adapter:
- Deskjet 450, 460 Mobile printers
- Deskjet 6940, 6980 printers
- Officejet 6300 printers
- Officejet 7200, 7300, 7400 printers
- Officejet H470 Mobile printers
- Officejet J6480 All-in-One printer
- Officejet Pro 8500 printers (A909)
- Officejet Pro L7500, L7650, L7680, L7780 printers
- Photosmart 320, 330, 370, 380 printers
- Photosmart 420, 470, 475 printers
- Photosmart 2600, 2700 printers
- Photosmart 3100, 3200, 3300 printers
- Photosmart 7830, 7850 printers
- Photosmart 8030, 8050 printers
- Photosmart 8150 Photo printer
- Photosmart 8238, 8250 printers
- Photosmart 8400 printers
- Photosmart 8450 Photo printers
- Photosmart A310 printers
- Photosmart A430 printers
- Photosmart A510 printers
- Photosmart A512, A516, A530 Photo printers
- Photosmart A610, A620, A630 Photo printers
- Photosmart A710 Photo printers
- Photosmart A820 Home Photo Center
- Photosmart C5100, C5200, C5300, C5500 printers
- Photosmart C6100, C6200, C6300 printers
- Photosmart C7100, C7200 printers
- Photosmart D5160, D5163 printers
- Photosmart D7100, D7200, D7300, D7400, D7560 printers
- Photosmart Plus All-in-One printer (B209)
Also Read: How to Set Up Any Printer on Windows 11 PC | Manual Printer Installation
Frequently Asked Questions
How do I make my printer wireless with a router?
With the use of your printer’s Ethernet port and attaching it to one of the vacant LAN slots at the back of your router, you’re connecting the printer to your local network.
If your router has built-in Wi-Fi, it means that all wireless devices connected to it will detect and print from the attached network printer.
How do I change my printer from wired to wireless?
A print server is a device that you can connect to your printer to offer it wireless capability. It acts as a bridge between your wireless router and the printer. The USB dongle connects to the USB port on your printer.
Can you turn a non-Wi-Fi printer into a Wi-Fi printer?
There are two main ways to add Wi-Fi capability to a non-Wi-Fi printer: Use a wireless print server. A wireless print server is a device that connects to your printer and your Wi-Fi network. It enables you to print from any device on your network, ignorant of whether it is connected to the printer directly.
Can I connect a wired printer to a wireless router?
Use a USB cable to connect your printer to the USB port on your wireless router. Generally speaking, higher-end routers will offer this functionality.
Why won’t my printer connect to my wireless router?
The printer should be plugged in, powered on, and within range of the wireless network. Moving the printer or router away can disrupt the Wi-Fi connection between the two, especially if there are walls, supports, or metal filing cabinets in the area.
What is a WPS button?
Wi-Fi Protected Setup (WPS) is a feature supplied with many routers. It is designed to make the process of connecting a secure wireless network from a computer or other device much easier.
What does WLAN mean on a router?
A wireless local-area network (WLAN) is a group of colocated computers or other devices that form a network based on radio transmissions rather than wired connections.
Do all routers have a WPS button?
It’s super easy to check if you have a WPS router. Just have a look around the back and you’ll probably find a small button labeled ‘WPS’ that you can press.
Some routers will have it placed on the front instead for easier access. Not all routers have WPS, and it’s not the end of the world if yours doesn’t.
What is the WPS PIN for your Printer?
A WPS PIN (Wi-Fi Protected Setup) is an eight-digit number that allows you to connect your printer to the Wi-Fi network without a password. There are more ways to find your printer’s network details, and the methods change even with printers from the same manufacturer.
How do I connect my HP printer to Wi-Fi WPS?
Place the printer and the computer or mobile device close to the Wi-Fi router. Put the printer in WPS connection mode. Most printers with a touchscreen control panel:
Open the Setup, Network, or Wireless settings menu, select Wi-Fi Protected Setup, select Push Button, and then select Start.
How to find a printer IP address?
- Access your computer’s Control Panel.
- Open Hardware and Sound.
- Access the Devices and Printers.
- Right-click on Printer and select Properties.
- If three tabs pop up, find your IP address in the Web Services tab.
- When five tabs pop up, find your IP address in the Ports tab.
For more information, tutorials, and methods, check out our official platform, and don’t forget to share with others to learn how to make a printer wireless with a wireless router.
You Should Also Read:
- How to Set Up Any Printer on Windows 11 PC | Manual Printer Installation
- How to Block People Off Your Wi-Fi Network Via Wi-Fi Deauthorization Attack
- How to Fix Bluetooth Device Missing from Device Manager | Possible Steps to Apply
- How to Create Wi-Fi Hotspot via the Command Prompt | Fixing No Hosted Network