How do you add a new printer to your Windows 11 PC? This article provides all you need to know on how to set up any printer on a Windows 11 PC. With Windows 11 installed on your PC, it automatically tries to detect and install any local printer (like printers that use a USB and DB-25 cables).
On the other hand, if the PC fails to set it up, then, you’re using an old printer, which can be hardly compatible with Windows 11 PC, or you’re to sync a wireless printer, you have to add the device manually.
With your Windows 11 OS installed, it comes with multiple features that you can use to set up any device (printer), some of these printers can be a brand-new multi-function printer, an old dot matrix, or even an inkjet or laser printer from manufacturers like HP, Canon, etc.
In this simplified guide, I will feed you the steps on how to add a wired or wireless printer to your PC. Therefore, I insist that you read the guides carefully and apply them respectively to get a fine result.
How to Set Up a USB or Wi-Fi Printer on a Windows 11 PC
Setting up any printer on a Windows 11 PC is easy, and possible only if you follow the steps outlined below:
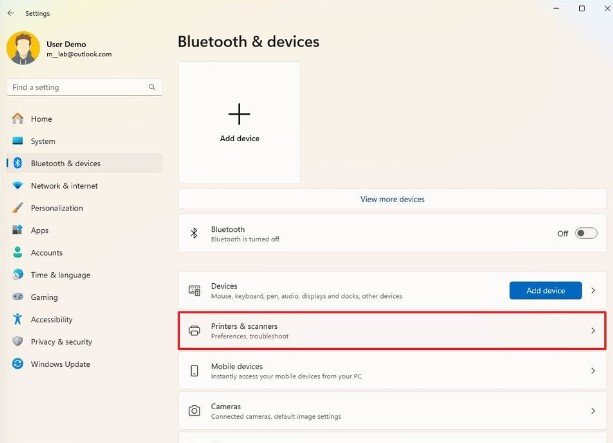
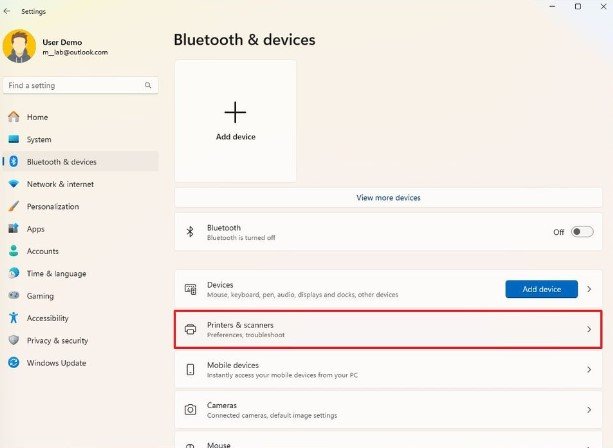
- Open Settings
- Click on Bluetooth & Devices.
- Then, click on the Printer & Scanner settings.
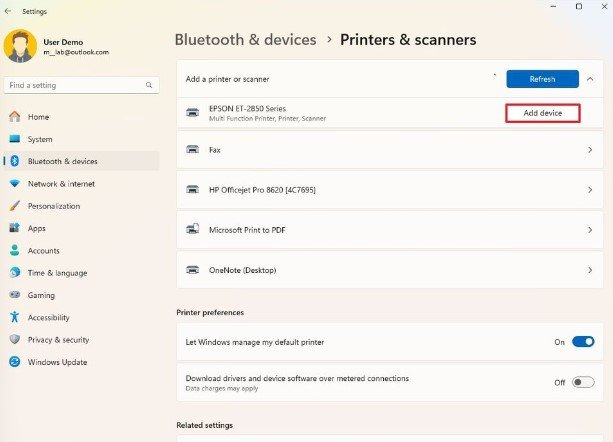
Printers & Scanner Settings - Click the Add device (Refresh) button
- Again, click on the Add Device button for the wireless or manually connected printer.
Printers & Scanner Settings
After applying the steps, the PC will detect and install the basic driver for that particular printer. Setting up a Wi-Fi printer can be easier, but how about those who could not afford a wireless printer, and had to use the manual printer? How do you set up a printer manually on Windows 11?
See the following subheading and find out…
How to Set Up a Printer Manually on a Windows 11 PC
If the PC cannot install the printer automatically due to its old version or it might have a compatibility issue, meanwhile, there are about three ways to install the device:
You can use the legacy wizard to install the printer manually, configure a TCP/IP connection if it’s a network printer, or use the option to connect a local printer by selecting the port manually.
How to Install Printer Manually
To install a printer with the use of the legacy wizard on Windows 11, apply the following steps:
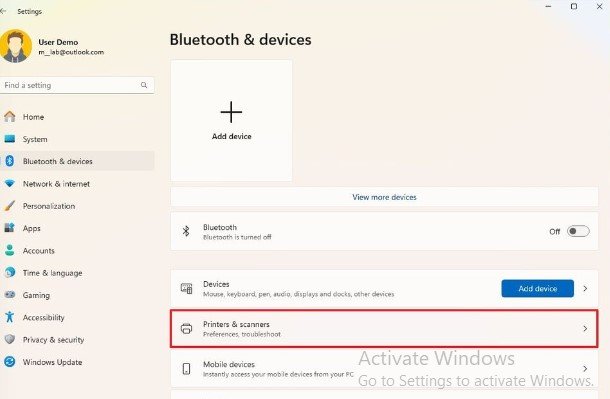
Open Settings
Click on Bluetooth & Devices
Click the printers & Scanners setting
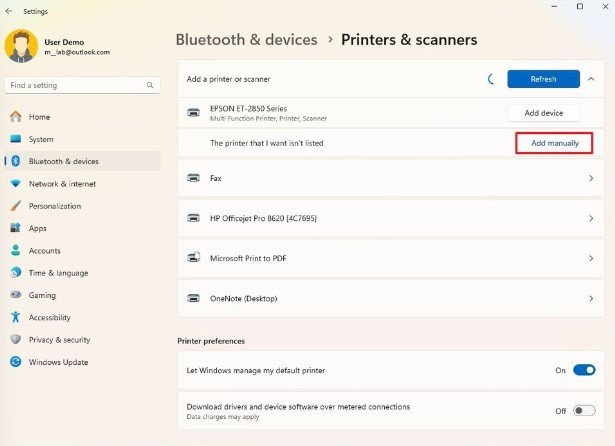
So, click the Add Device button
Then, click the Add Manually button.

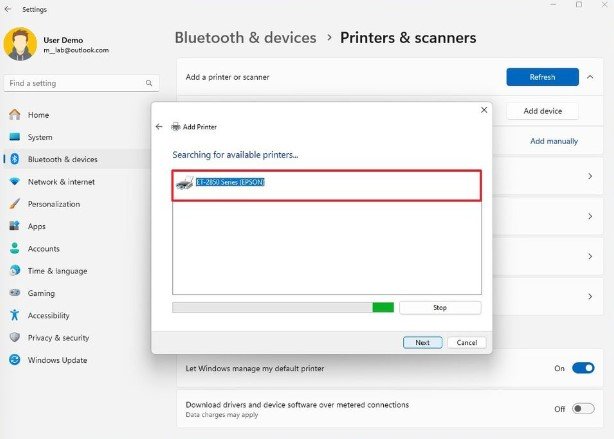
- Take Note: This option may take some time to appear while the PC searches for printers locally and in the network
Select the “My Printer is a little older” option.
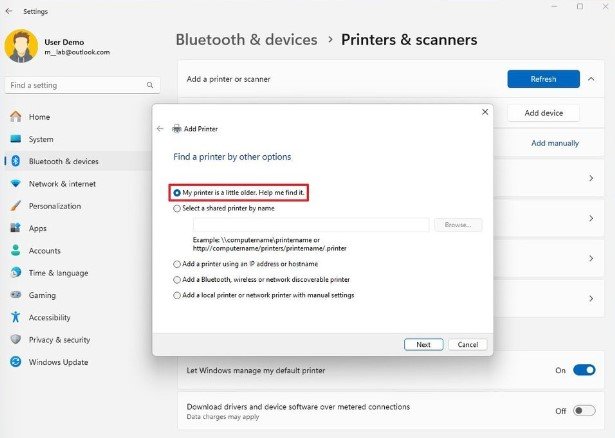
Choose the printer from the list.
Click the Next button
Click the Windows Update button ( if applicable)
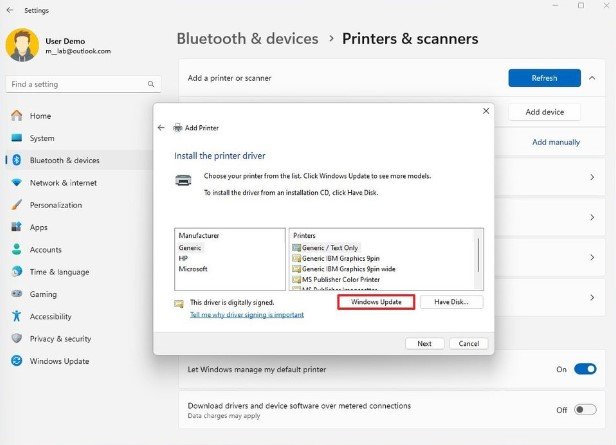
- Take Note: Windows does not add the basic printer drivers. This means that if you click the “Windows Update” button, it might take some time till the information is available. Meanwhile, if it’s an old printer and a similar driver model is not available, then you should select the closest model.
Choose the printer brand from the left side
Then, select the printer model from the right side.
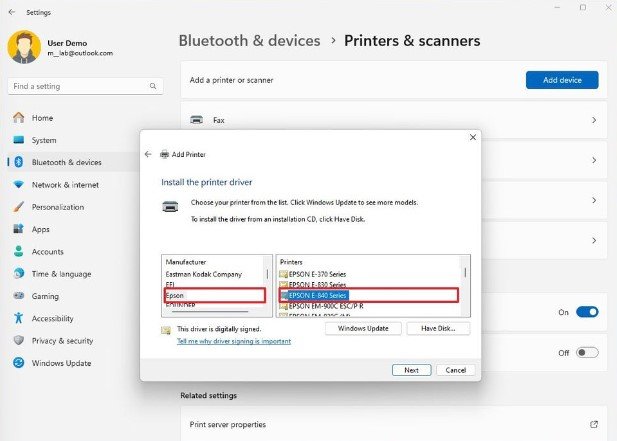
- Tips: When the printer driver is not available, you can simply click the “Have Disk” button to provide the driver manually. Always check your device manufacturer to download the printer drivers.
Click the Next button
Also, Confirm a name for the printer ((Optional)

Click the Next button
Choose the “Do not share this printer” option
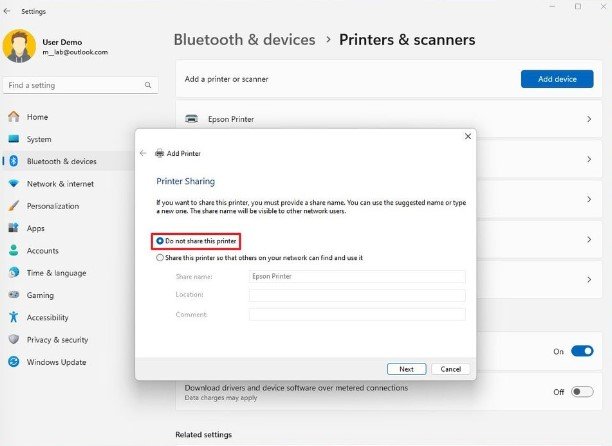
Click the Next button
Click on the “Print a test page” button to confirm the setup
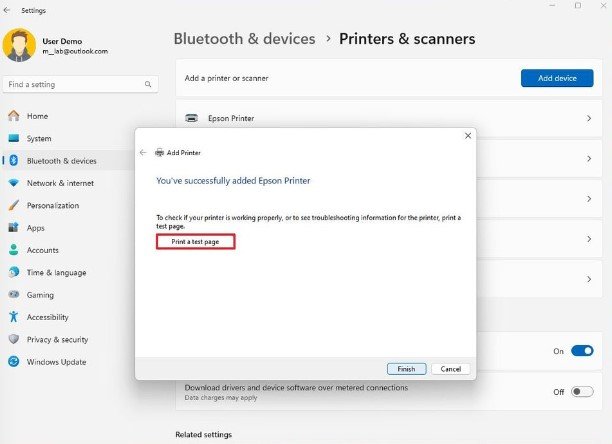
Finally, click the Finish button
Once you complete the steps, if the test page prints out, you’ll know that the printer has been successfully installed on Windows 11.
How to Install Network Printer
Follow the steps below, if you want to install a network printer:
- Open Settings
- Click the Bluetooth & Devices
- Click the Printers & Scanners Settings
Printers & Scanners Settings - Then, click on the Add Device button
- Select the Add Manually option
Printers & Scanners Settings - Select the “Add a printer using TCP/IP address or hostname” option
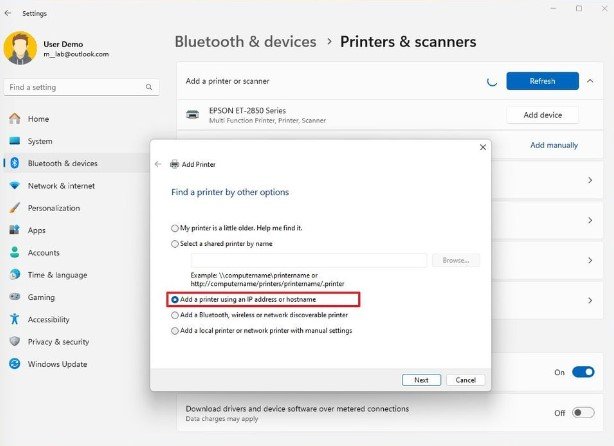
Add Printer - Click the Next button.
- Select the TCP/IP Device option with the use of the “Device type” drop-down menu.
- Then confirm the IP address of the printer in the “Hostname or IP address” field, for example, 10. 1.4.128.
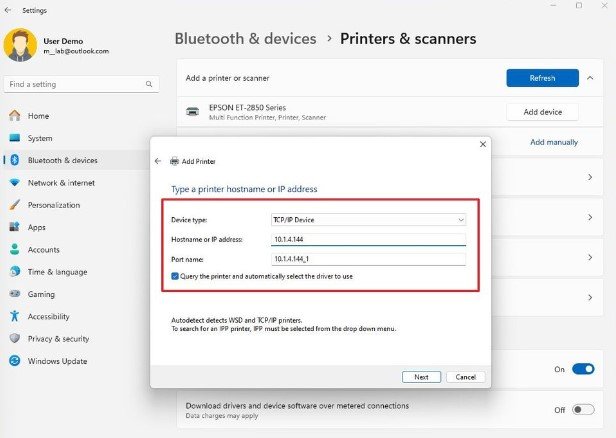
Enter the Printer Hostname or IP Address - Make use of the leave the default name in the “Port name” field. (Optional)
- Check out the “Query the printer and automatically select the driver to use” (Recommended).
- Click the Next button
- Click the Windows Update button ( if necessary)
- Choose the printer brand from the left side.
- Then, select the printer model from the right side.
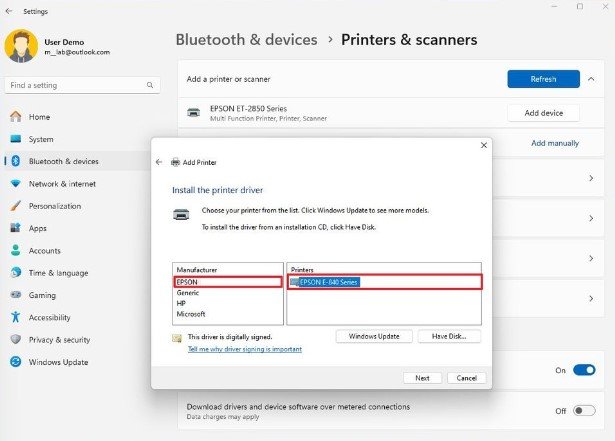
Select Printer Driver - Click the Next button
- Confirm a name for the Printer (Optional)
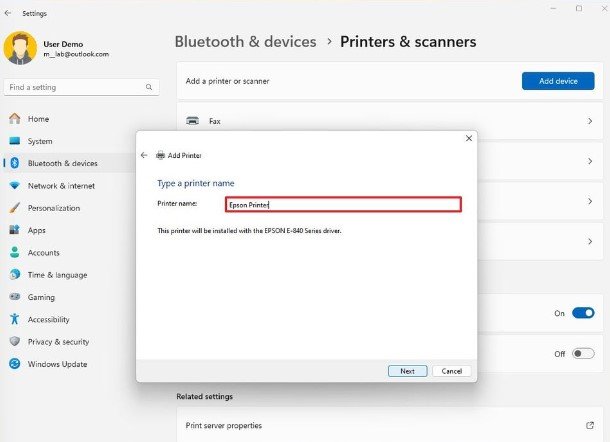
Confirm the Printer Name - Click the Next button
- Choose the “Do Not share this Printer” option.
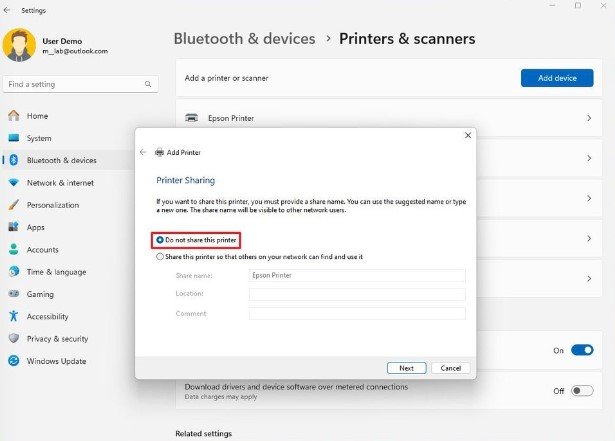
Printer Sharing Options - Click the Next button
- Select the “Print a test page” button to confirm that the device is operative.
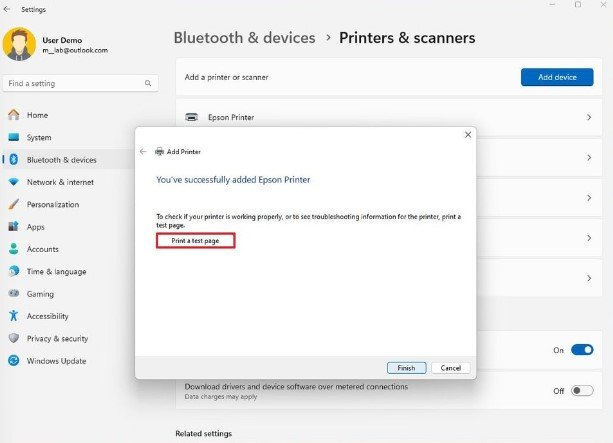
Printer Test Page Setting - Finally, click the Finish button
After completing the steps, the network printer should be on and working on your PC. Now see the following subheading, and learn how you can install the Local Printer.
How to Install the Local Printer
Installation of the Printer with the use of a Parallel or serial cable, apply the following steps:
- Open Settings
- Click on Bluetooth & Devices
- Click the Printers & Scanners setting
- Then, select the Add Device button
- Click the Add Manually button
- Choose the “Add a local printer or network printer with manual settings” option.
- Then click the Next button
- Select the printer’s port with the “Use an existing port drop-down” menu.
- Click the Next button
- Select the printer brand from the left side
- Choose the printer model from the left side.
- Click on the Next button
- Confirm a name for the printer (Optional)
- Click the Next button
- Choose the “Do not share this printer” Option.
- Click the Next button
- Then, click the “Print a test page” button to confirm that the device is functioning.
- Finally, click the Finish button.
Note: In the process, if you are using a USB cable, choose the USB option. Meanwhile, if you’re making use of a parallel cable with a “DB-25” adapter, select the LPT1 port.
Once you complete the above steps, the old printer should be installed and ready to print on Windows 11. Although, if you’re using the automatic setup, Windows 11 will install the driver for the printer.
When about to take advantage of the advanced features, you may need to add the printer with the use of the manufacturer’s software.
How to Install the Latest Printer Drivers
Updating your driver frequently is extremely important. Meanwhile, optional updates normally update a few of the drivers, some need you to download the driver manually from the manufacturer’s website.
In this section of this article, we are going to see how you can install the following printer drivers and software listed below:
- Canon
- HP
- Epson
- Ricoh
- Brother
- Panasonic
- Lexmark
- OKI Printers
How to Download Canon Printers Software & Drivers
Here’s one of the biggest printer manufacturers, Canon. Simply follow the steps to quickly install the driver:
- Visit support.canon.com
- Search the product name, and click Enter
- Click on the “Drivers & Downloads“
- Finally, your driver is being downloaded.
Is Canon printer software a suitable choice for you? You can just click on the Software tab, then, download the one you need.
After the driver is downloaded, you just need to double-click on the driver & follow the on-screen guidelines to install the driver on your PC.
As earlier said, the Canon Printer is among the most powerful and common in offices, businesses, and households. However, at times, you might need an installation CD to connect your device to your PC.
How to Download HP Printers Drivers & Software
Here we have HP printers. To install the driver for your HP Printer, all you have to do is to have a knowledge of your model number with a decent internet connection. Now, apply the following steps to download the driver:
- Go to support.hp.com
- Type in your Model number and click on the Submit button
- Widening the option you want, then download the software
Once you’re done downloading it, run the installation media, follow the on-screen instructions, then install it.
How to Install Epson Printer Drivers & Software
Follow the steps in the following outline, and find out how to install Epson Printers drivers and Software:
- Visit the epson.com
- Enter the Model Number, then click search
- Then, expand the options & download the driver.
If you want to install Epson Connection Utility, visit the epson.com/Support. Once you’re done installing the needed setup files, you should click on the package & install it on your PC.
How to Download Ricoh Printer Drivers & Software
Follow the steps below, and find out how you can download Ricoh printer drivers:
- Visit Ricoh-usa.com
- Apply your Model number, Product category
- Then, download the driver for your printer
How to Download Brother Printer & Software
To install Brother printer drivers, apply the following steps and find out:
- Navigate to support.brother.com
- Use the Model Number to find the drivers
- Then download the driver for your OS
To conclude, simply follow the normal package to install the driver on your PC.
How to Download Panasonic Printers Drivers & Software.
Follow the Panasonic Printers & software to update its drivers:
- Access Panasonic.net
- Select your Model number from the given catalog
- Then, you’ll be redirected to the driver download platform, simply just download the driver or any kind of software.
Once you’ve downloaded the software, double-click on the installation package, then install it to enjoy on your PC.
How to Install Lexmark Printers Software & Devices
To install Lexmark printers, you need to go to lexmark.com, then enter the Model number in the field, and click on the Free Drivers & Downloads button.
Next, you need to click on the driver or utility you want to install, and sign agreements, then you’re good to go.
How to Download OKI Printers Drivers & Software
Do you have an OKI Printer, and do you need to download its software & drivers? visit oki.com Now, from the product list, choose yours, and then select the model number.
Lastly, select your OS, and download the driver & software you want. Once you’re done, you should probably open the file explorer, and go to downloads to install such a driver on your PC.
Do you know that when your Windows 11 printer driver is outdated or missing, then you may not be able to print smoothly? Let’s find out ways you can download and update the printer driver in Windows 11.
Windows 11 Printer Driver Download Procedures
Apply the following steps, if you want to download the Windows 11 Printer Driver instantly:
- You should install the latest printer driver in Windows 11 with the Windows Update, and this can be done if you click Start -> Settings ->Update & Security.
- Then click the Check for updates button. Windows will then automatically find updates from your PC including the printer driver. Once it finds an updated driver version for your printer, it will instantly download & install the printer driver on your Windows 11 PC.
- Now, you have to update the Windows 11 printer driver from the device manager. Here you have to click Start & select Device Manager to open Device Manager in Windows 11.
- Find your printer from the list of devices, click on your printer & choose Update Driver.
- Click on search automatically for updated driver software, Windows will begin searching, downloading, and installing the latest updated driver for your device.
- You can also download & install the latest printer driver from the printer manufacturer’s website. You simply need to just go to the website’s support or driver’s download page.
- Some printer product platform often allows users to search for printer model numbers. So, you can just search for your printer and see if the latest printer driver is in stock.
- If eventually you find the latest printer driver model, you can download the file & click the file to install it on your Windows 11 PC.
Once you’re done completing these steps, you’re good to go, you can now install any printer you want to install on your Windows 11 PC. What if you wish to remove the printer on a Windows 11 PC, how do you do that?
Let’s find out in the following section of this article.
How to Remove any Printer on Windows 11 PC
If you want to remove any printer on your Windows 11 PC, you just need to follow the steps below carefully:
To do this:
- Click on Start >> Settings >> Devices >> Printer & Scanners
- Find your printer under Printers & Scanners, click it,
- Then select Remove Device to remove the printer from your Windows 11 PC
- If you want to add a printer again, or probably another printer, simply click on Add a Printer or Scanner.
- Choose the printer, click Add Device, and then you’re ready for reinstallation.
How to Configure Printer Settings in Windows 11 PC
You can customize the print settings easily once you open the print control dialog box. On the other hand, you can also set up the defaults from the Windows Settings app before you use the Printer.
Click on the added printer name in the “Printers & Scanners” section of the settings app, and navigate to your “Printer Settings” tab. Then follow the steps below:
- Click on the “Open print queue” to see the list of documents that are getting printed and cancel any job you don’t want to print.
- Printer properties & preferences options enable you to set up color or black or white, orientation, paper size, quality, etc.
- Make use of the “Run the troubleshooter” option to find & fix the printer’s connection issues in your PC.
- Also, go to the “Scanning settings” tab & configure scanning properties as well.
To enable your printer to a default printer, simply go to Control Panel\Hardware and Sound\Devices and Printers in the Control Panel app. Click on the printer name & choose the “Set as default printer” option.
How to Troubleshoot any Printer in Windows 11 PC
Unluckily, printers seem to be notoriously fickle machines. So, here are a few troubleshooting measures you can take, and try to resolve issues like detection or printing issues.
There are three measures you can take, see below:
Restart your Windows 11 PC
Restarting your system could fix lots of issues. If your printer is not detected, or maybe it was detected but not operating the normal way, then restarting your PC could be an option, and may fix the issue instantly.
Double Check the Printer’s Set Up instructions
Lots of printers that are sold out today have smart & wireless functions. It makes it convenient for us to use, but it also makes space for more problems to occur.
Therefore, make sure that any setup instruction that comes with the printer should be followed carefully & closely, and ensure that any connections to your PC are secure.
Manufacturer Printer Drivers
If your printer comes with more advanced features, like an all-in-one, or Windows 11 did not install the printer’s driver correctly, It should be necessary to install drivers from the manufacturer.
Use the disk added with your printer, if you find one. In other cases, go to the manufacturer’s website, and access the drivers in the Support section > Downloads or Support > Drivers and Software.
See the links to printer driver pages in the list below:
After your printer is set up & running, you can manage your printer settings or set your printer as the default printing device for your PC.
If you find yourself printing an entirely different thing frequently, then you should consider installing the printer more often with different settings to save time.
Ways to Install a Printer Without the Installation Disk
Printers like HP, Epson, or Canon will surely automatically prompt you to download the appropriate software once it’s connected to a PC. You could connect your printer with a cable for Mac or Windows.
There are three methods or ways to install a printer without the installation disk, which we will discuss in the section of this article, so sit back & read carefully.
Way 1: Using a USB Cable on a Windows 11 PC
- You could plug the printer’s USB cable into your computer. It should fit into one of your PC’s USB ports on the side of the system or elsewhere it may be located on the system.
- Then if your printer does not have a USB cable, you may need to get one for your printer before you continue the process. If there’s no USB cable available for your printer, then you have to install the software manually.
- Turn on the Printer
- Open Start
- Type Printers & Scanners into Start, and click on it
- Click your printer’s name
- Then follow the on-screen installation steps
Way 2: Using a USB Cable on a Mac PC
- First, ensure that the printer is compatible with Mac
- Make sure the printer is very close to your PC
- Ensure that you have a USB adapter if necessary
- Insert the printer’s USB cable into your Mac PC
- Turn on the Printer
- Then click on the Install option when prompted
- Follow the on-screen prompts to finish the process.
Way 3: Software Download
- Check out your Printer’s manual
- Visit the manufacturer’s website
- Click the Printers tab
- Find your printer model
- You should find a “Software” Download link
- Click on the download link for your device’s software
- Then wait for your printer’s driver software to download
- If you’re on Windows, unzip the folder
- Click twice on the software setup file
- Follow the on-screen guides
- Try to connect your printer
Related Questions People Ask
How do I get Windows 11 to recognize my Printer?
- First, select the Start button, then select Settings > Devices > Printers & Scanners. Open Printers & Scanners Settings.
- Choose Add Printer or Scanner. Exercise patience for your device to find nearby printers, select the one you want, and then click on Add Device.
Is Windows 11 compatible with all printers?
Yes! All printers should be compatible with no issues. According to Microsoft, Windows 11 is based on the solid foundations of Windows 10 OS.
Therefore, your current printer should be compatible with Windows 11. Any compatibility issues depend on your system hardware, not the printer.
How do I get my old printer to work on Windows 11?
If your PC cannot install your old printer automatically, it’s possible to install the device in at most three ways as explained in this article, see through the article and find out.