
Do you want to use your Windows PC as an internet-enabled wireless hotspot for other devices you have? We hope this article will assist you effectively. If you’re using Windows 8.1 or Windows 7, you can create a Wi-Fi hotspot using the Command Prompt with the hosted network feature.
If you use Windows 10 or 11, you might be able to access the Command Prompt if your Wi-Fi card accepts the current depreciated “hosted network” option. If not, it’s very easy to create a hotspot in the modern version of Windows in the settings section.
This article will teach you how to share your Windows PC’s internet connection as a wireless hotspot with the use of Command Prompt (CMD). Here are the things you should consider before reading this article:
- To create the hotspot, use this command: netsh wlan set hostednetwork mode=allow ssid=NETWORK key=password.
- To start the hotspot, use this command: netsh wlan start hostednetwork
- If you’re using Windows 10 or Windows 11, create the hotspot in Settings instead of Command Prompt.
Here we’ll consider two methods effectively, and carefully apply the steps as you go through each method for creating a Wi-Fi hotspot via the command prompt.
Method 1: Creating the Hotspot

1. As an administrator, open the Command Prompt. You need administrator access to turn on your PC’s Wi-Fi hotspot with the Command Prompt.
- Tap on the Windows key on your keyboard or click the Start Menu.
- Type & search for cmd
- Click on Command Prompt, and choose Run as administrator.
- Then, click on Yes or confirm your administrator password to keep up.
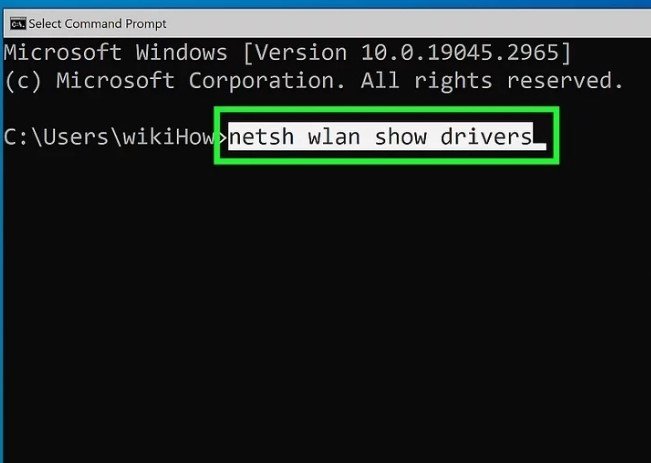
2. Type netsh wlan show drivers and press Enter. With this command, it displays information about your wireless drivers.
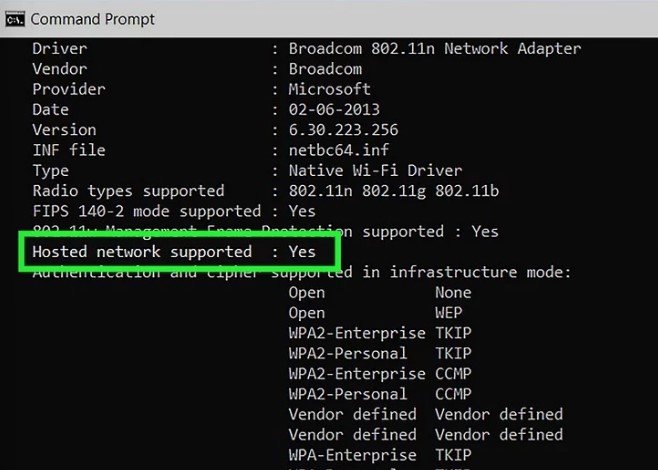
3. Search for Yes next to “Hosted Network Supported” If there’s Yes there, it means your PC supports the Hosted Network Feature, which enables you to share your internet connection via Wi-Fi Command Prompt.
- If you see No there and are using Windows 8.1 or Windows 7, check out the Fixing No Hosted Network for a fix.
- If you see “No”, and you’re using Windows 10 or Windows 11, your device does not support creating a Wi-Fi hotspot with the use of hosted network method. Microsoft depreciated this feature in Windows 10, therefore, most Wi-Fi drivers no longer support it.

4. Enter the command to create your Wi-Fi hotspot. In the next command, replace “NETWORK” with the name of the hotspot you want to create, and “PASSWORD” with the password people would use to connect :
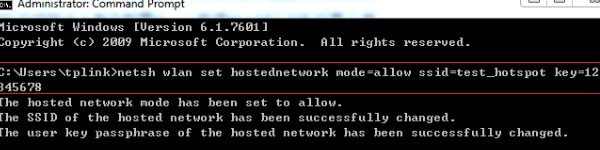
- Type netsh wlan set hostednetwork mode=allow ssid=NETWORK key=PASSWORD and press Enter.
- You should see the message “The hosted network mode has been set tp allow“, and Some information about the SSID and passphrase being changed.
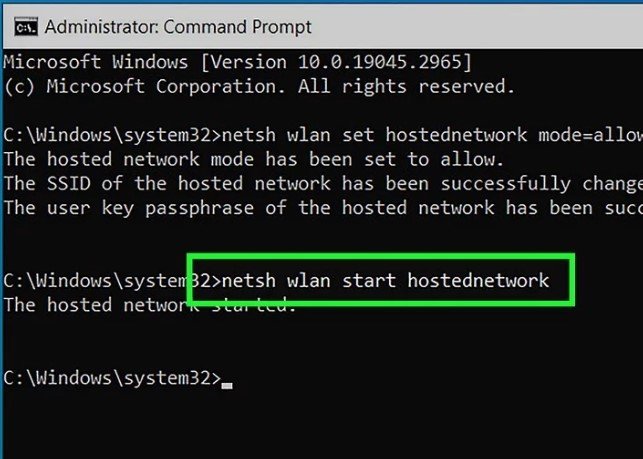
5. Type NETSH WLAN start hostednetwork and press Enter. This will turn on your Wi-Fi hotspot.
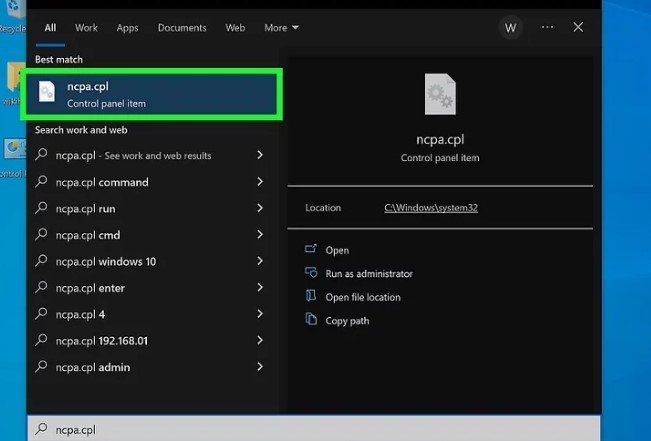
6. Open the Network & Sharing Center. As you’ve created a Wi-Fi hotspot, you’ll need to enable it to share your main internet connection. To begin, type ncpa.cpl into the Windows search bar & press Enter.
- Also, you’ll find it in the Control panel, or by pressing Ctrl + X and selecting Network Connections.
- Once you open Network and Sharing Center, you should see a connection for your hotspot, it should have a name like “Local Area Connection” along with a number.
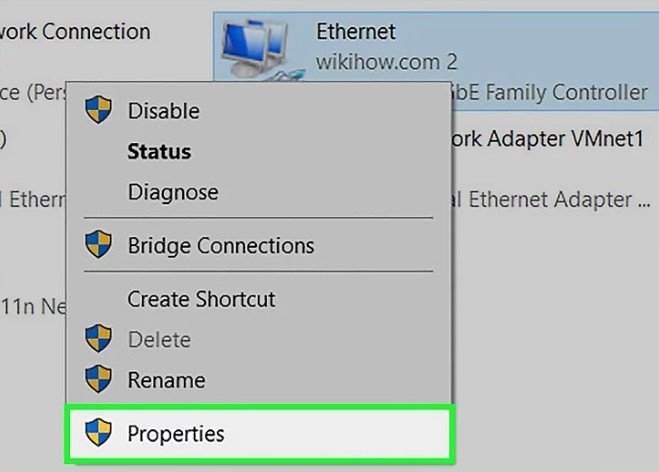
7. Click your Primary Internet Connection and choose Properties. Ensure that you do this on the adapter you use to connect to the internet. For instance, if you connect to the internet through Wi-Fi, click your Wi-Fi adapter and select Properties.
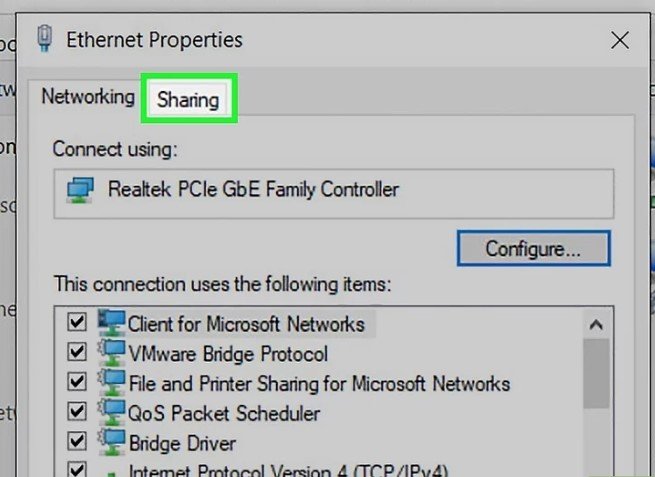
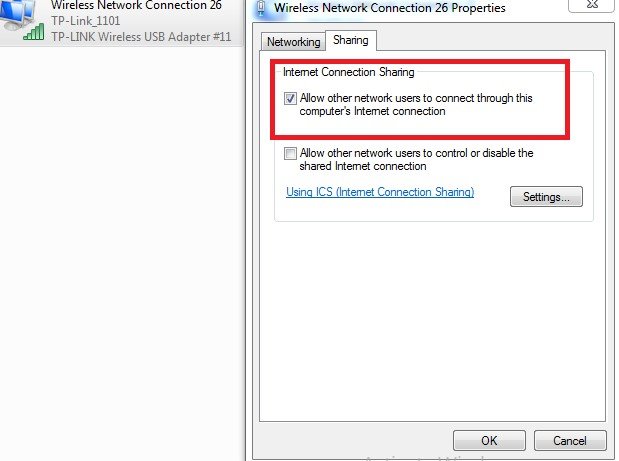
8. Click the Sharing tab. This option can be seen at the top of the Windows.
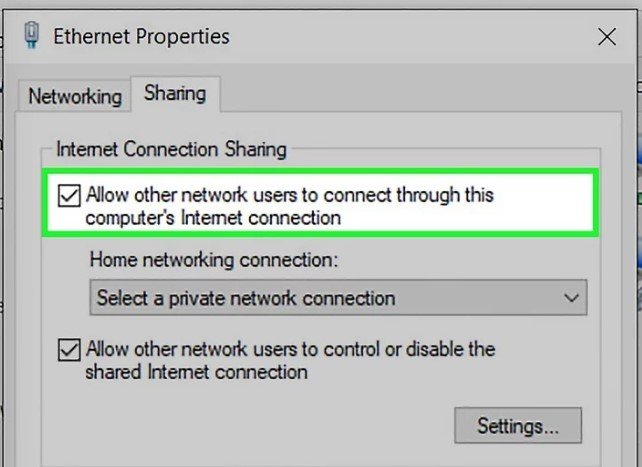
9. Check out the “Allow other network users to connect” box. You can find it at the top of the window.
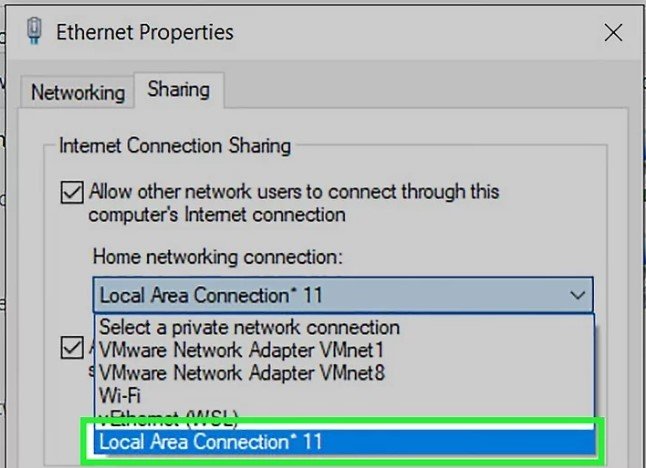
10. Choose your hotspot adapter from the menu. Under “Home networking connection” click the menu & select Local Area Connection (number).
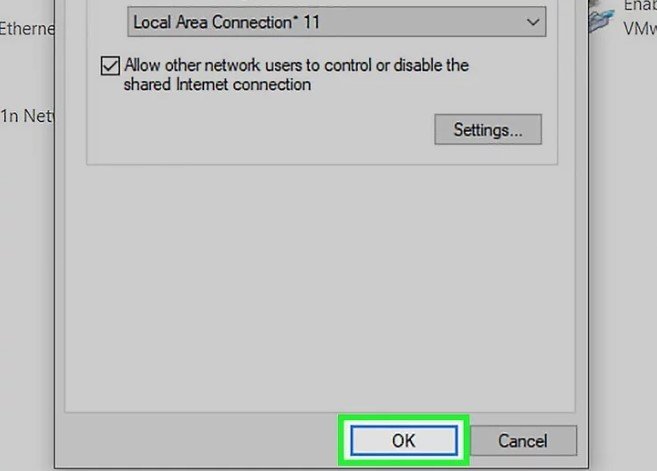
11. Click OK. The Wi-Fi hotspot you created in Command Prompt is currently ready to use. Nearby devices can now connect to your PC wirelessly to share its internet connection.
Method 2: Fixing No Hosted Network
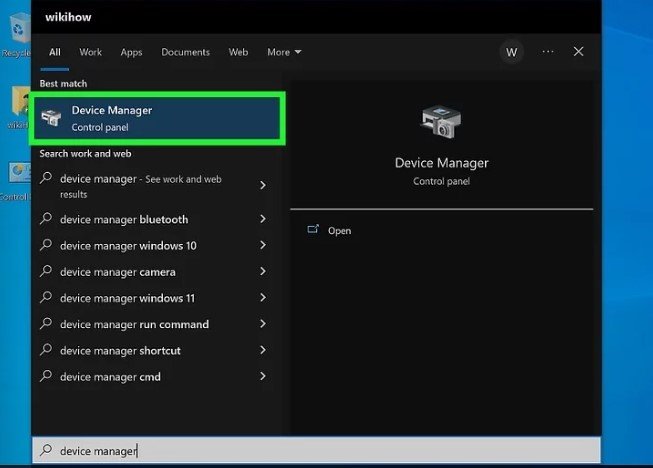
1. Open Device Manager. Type the device in the Windows search box, then Click Device Manager to launch it.
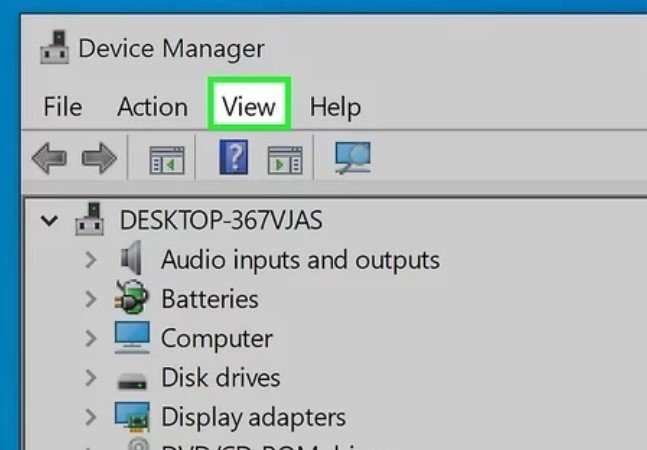
2. Click the View menu. It’s at the top of the Window.

3. Select the Show Hidden Devices option. This reveals the adapter you’ll need to enable your hosted network.
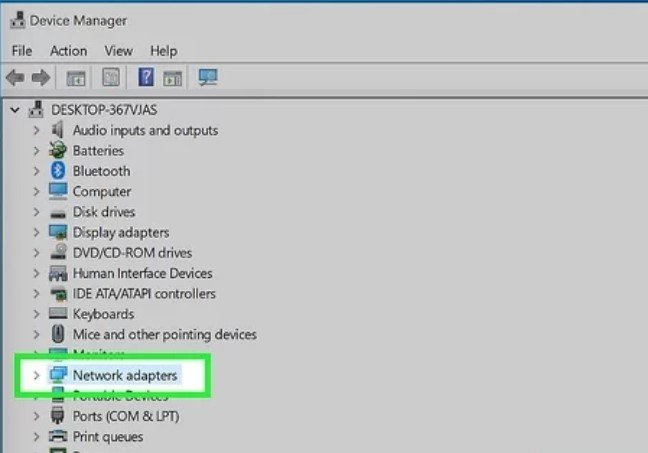
4. Expand the “Network adapters” menu. You should see the list of adapters.

5. Click on “Microsoft Hosted Network Virtual Adapter” and select Enable. Once you see this option, enabling it will typically allow hosted network support. You can try this out by returning to Command Prompt and typing netsh wlan show drivers.
- If you don’t find a Microsoft Hosted Network Virtual adapter, you might be able to install it.
- Click on your Wi-Fi adapter and choose Update driver software.
- Then click Browse my computer for driver software.
- Also, click on Let me pick from a list of device drivers on my PC.
- Choose the first driver and click Next
- Once the driver is installed, look out for the Microsoft Hosted Network Virtual Adapter again. If you don’t find it, go back to the driver list and try the next driver. Repeat the procedure until you install a driver that comes with the proper adapter.
- If none of the drivers there could help, it is likely, that your hardware does not permit enabling a Wi-Fi hotspot from Command Prompt.
How to Setup a Mobile Hotspot on Windows 7 and Windows 8.1
Here, you will learn how to configure Soft AP via the tool built into your Windows:
- Search for “cmd” in the Start section of your Windows and open it.
- Enter “netsh wlan set hostednetwork mode-allow ssid=key“. Note: SSID means the network name you shared, while key means the password you used on the network.
- Access the “Control panel-Network and sharing center“, and click on “Change adapter setting“.
- Click on the adapter you used, and then, click on “Properties-Sharing”, and tick the “Allow other network users to connect through this PC’s internet connection” box.
- Enter “netsh wlan start hostednetwork” in the command.

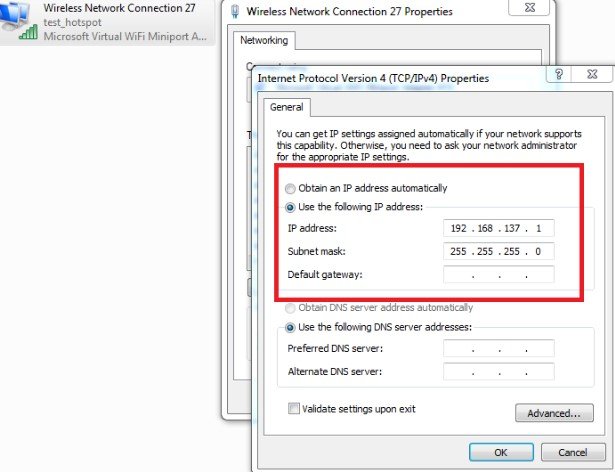
- Also, check if your virtual Wi-Fi adapter has an IP address with “192.168.x.1“, if not, you need to set a static IP for it.
- Then, if you want to close this hotspot, please enter “netsh wlan stop hostednetwork” in the command to stop its operation.
How to Turn Windows 10 PC into a Wireless Hotspot
Windows 10 OS has a feature that’s called “Hosted Network“, this feature allows you to turn your PC into a wireless hotspot, this section of this article will guide you on how to do & use it
Although you’re connecting to the internet with the use of a wireless or wired adapter, unlike other previous versions of OS, Windows 10 enables you to share an internet connection with other devices, and this feature is known as Hosted Network.
The Hosted Network is a feature that comes together with the Netsh (Network Shell) Command-Line Utility.
It was previously operative in Windows 7 and allows you to use the OS to create a virtual wireless adapter, which Microsoft called the “Virtual Wi-Fi“, and came with a SoftAP, which is a software-based wireless access point.
Via the combination of these two features, your computer can move its internet connection and share it with other devices, which essentially acts as a wireless hotspot.
To open the Command Prompt with an administrator permit, you have to use the Windows key + X keyboard shortcut and choose Command Prompt (Admin).
How to Check If Your Wireless Adapter Allows Hosted Networks in Windows 10 OS
Creating a wireless hotspot in Windows 10 should be relatively straightforward, do not allow the command line to scare you off. Simply follow the following steps to configure a Wireless Hosted Network.
1. In the Command Prompt, apply the following command: NETSH WLAN set hostednetwork mode=allow ssid=Your_SSID key=Your_Passphrase, here the SSID would be the name you want to identify your wireless network when connecting your new device.
The Passphrase is the network security key you want users to use to connect to your network. (Note that the passphrase must be at least 8 characters long).
2. Once you’re done creating a Hosted Network, enter the following command to activate it: NETSH WLAN starts hostednetwork.
How to Share Your Internet Connection With a Hosted Network in Windows 10
Now, you’ve created and started a Hosted Network in your Windows 10 PC. On the other hand, any wireless usable device would not be able to enter the internet yet.
Lastly, you need to share an internet connection using the “Internet Connection Sharing” feature via a physical network adapter.
- With the Windows key + X keyboard shortcut, open the Power User Menu, and choose Network Connection.
- Also, click on the network adapter with an internet connection, which could be a traditional ethernet or wireless network adapter. Then choose properties. Note: In the Network Connections, you should see the new Microsoft Hosted Virtual Adapter, which is labeled Local Area Connection * X, and with its SSID name.
- Then, click the Sharing tab
- Check the Allow other network users to connect through this computer’s internet connection box.
- From the Home Networking Connection drop-down menu choose the Microsoft Hosted Virtual Adapter.
- Finally, click OK to finish.
At this level, you should have access to connect to any wireless capable device to the newly created software access point, and with stable access to the internet.
How to Stop Sharing an Internet Connection with Other Devices in Windows 10
Do you want to temporarily stop allowing other devices to connect wirelessly via your PC, you should type the following command in the Command Prompt, and press Enter.
NETSH WLAN stop hostednetwork
At any time you want, you can use the start variant of the command to allow other devices to have access to the internet via your PC as an access point without more configuration.
NETSH WLAN start hostednetwork
Moreover, you can similarly use the following command to allow or disable a wireless-hosted network:
NETSH WLAN set hostednetwork mode=allow
NETSH WLAN set hostednetwork mode=disallow
How to Change a Hosted Network Settings in Windows 10
In this case, where you want to change some of the recent settings, which might include SSID or network security, you can apply the following commands:
NETSH WLAN set hostednetwork ssid=Your_New_SSID
NETSH WLAN set hostednetwork key=Your_New_Passphrase
How to View the Current Hosted Network Settings
Here, there are two commands you use to view the Hosted Network settings on your PC: the following command displays the mode and SSID name in use, the maximum number of clients that can connect, the type of authentication, and cipher:
NETSH WLAN show hostednetwork
Moreover, the following command will show you the current network security key in the settings, which is similar to the previous command:
NETSH WLAN show hostednetwork setting=security
How to Disable a Wireless Hosted Network in Windows 10
Since the setup of a Wireless Hosted Network in Windows 10 is slightly complicated, Microsoft does not make it straightforward to pull out the configuration if you don’t need the feature anymore.
Even though, you can use the disallow commands, these actions won’t remove the settings from your PC. If you want to completely remove the Hostees Network settings in Windows 10, you’ll have to modify the Registry.
- Open the Start menu, search for regedit, press Enter, and click OK to open the Registry with the admin rights.
- Navigate down the following path in the Registry: HKEY_LOCAL_MACHINE\system\currentcontrolset\services\wlansvc\prameters\hostednetworksettings, click the HostedNetworkSettings DWORD key, select Delete, and click Yes to confirm deletion.
- Restart your PC
- Open the Command Prompt and use the following command: NETSH WLAN show hostednetwork, you will know that you have successfully deleted the settings once the Settings field reads Not configured.
- Ensure that you put off “Internet Connection Sharing” in the physical network adapter that was sharing the internet with other devices. Use the Windows key + X keyboard shortcut to access the Power User Menu, and choose Network Connections.
- Click the network adapter, and choose Properties.
- Then, click the Sharing tab
- Uncheck the Allow other network users to connect through this computer’s internet connection option.
- Finally, click OK to complete the process.
How to Turn Windows 11 PC into a Wireless Hotspot
Sometimes you will want to convert your Windows 11 PC to a Wi-Fi Hotspot. Meanwhile, when connecting all your devices to a single Wi-Fi, there can be situations when it may not be possible.
For example, if you’re put up in a hotel, and their internet connection is only for a single device, that’s when you’d like to turn your PC to a Wi-Fi hotspot and share the connection with other devices you have.
Let’s cut the chase, and see how you can turn your Windows 11 PC into a Wireless Hotspot.
Method 1: Through the Setting Section
This is a common method of converting your Windows 11 PC into a WiFi Hotspot within a minute. Let’s find out how to make changes in the Settings app on your PC to allow the mobile hotspot to share your computer’s internet connection with other devices:
- Tap the Win + I keys together on your keyboard to open the settings app.
- In the app window, click on the Network & Internet at the left side of the pane.
- Then, go to the right side of the window, navigate down, and turn on the Mobile hotspot.
- If you’re using the mobile hotspot for the first time, ensure to name your Hotspot, and add a password, which will make your connection secure, and free from unauthorized access.
- Scroll down to the bottom, and under the Properties section, click on Edit. In the edit network info, go to the Network name field, and add any name of your choice, that’s easy to not forget.
- Then in the Network password field, add a password of not less than 8 characters. Click on Save to save the changes.
Exit the Settings app, and now, you’ve successfully allowed the mobile hotspot on your Windows 11 PC, now you can connect other devices to your PC’s mobile hotspot for internet connection.
Method 2: Via Command Prompt
Since you can turn on your Windows 11 PC to a Wi-Fi hotspot via the Settings app, at times it might not comply, then, that’s when you can enable the mobile hotspot on your PC manually, via the Command Prompt:
1. Press the Win + R keys simultaneously on your Keyboard to access the Run command box.
2. In the Run command search bar, type cmd, and press the CTRL + Shift + Enter keys together on your keyboard to launch the elevated Comand Prompt window.
3. Then, in the Command Prompt (Admin) window, run the below command and Enter:
netsh wlan show drivers
This should assist you in finding if your PC allows the virtual hotspot or not.
4. Now, close the Command Prompt, and re-open it again with the above steps with administrative rights. Then, enter the below command in the elevated Command Prompt:
netsh wlan set hostednetwork mode=allow ssid=key=
The SSID means the name you want to show others, it could be anything you want it to be. The Key syntax here is the password, you can enter your required password, but let it be something you easily remember.
5. Copy & paste the below command, and press Enter to remove the hosted network you formed above, with SSID as Formidable:
netsh wlan start hostednetwork
Then a message will return that says “The hosted network mode has been set to allow“, which means that the command has been successfully executed.
6. Before sharing your PC internet with other devices, here you can view the virtual hotspot properties by pulling off the third command as quoted below and hitting Enter. The command will release all the information with the created hosted network.
7. Then, to share my PC Wi-Fi with other devices, apply the steps below: Press the Win + R shortcut keys to access the Run command.
8. Within the search bar, type ncpa.cpl, and press OK to open the Network Connection Window.
9. In the properties dialogue box, visit the Sharing tab, and check the box next to it, Allow other networks to connect through this computer’s network connection. Choose the Home networking connection from the drop-down.
10. Uncheck the box next to the Allow other network users to control or disable the shared internet connection option. Press OK to save the changes and exit
11. Run the below command in the Command Prompt (admin) window to stop the shared network, and hit enter.
netsh wlan stop hostednetwork
Finally, you’ve successfully converted the Windows 11 PC to a Wi-Fi hotspot.
How to Change the Mobile Hotspot Name & Password in Windows 11
This method assists you not just in retrieving your mobile hotspot, but also enables you to change & customize the mobile hotspot for stronger security, see how you can do this:
- Press the Win+I keys at once on your PC to launch the Settings app
- In the settings window, click on the Network & Internet option on the left
- Go to the right side, and scroll down small, then click on Mobile hotspot
- If you’re using the mobile hotspot for the first time, ensure to name your Hotspot, and add a password, which will make your connection secure, and free from unauthorized access.
- Scroll down to the bottom, and under the Properties section, click on Edit. In the edit network info, go to the Network name field, and add any name of your choice, that’s easy to not forget.
- Then in the Network password field, add a password of not less than 8 characters. Click on Save to save the changes.
Finally, you’ve successfully retrieved and changed the Mobile Hotspot password on your Windows 11 PC. With these guides, methods, and procedures, you should be able to handle anything that has to deal with creating a Wi-Fi mobile Hotspot with the use of Command Prompt (CMD).
Also, you should consider sharing this article with others who are finding it difficult to create a Wi-Fi hotspot for themselves, this article will surely be a gateway for them. Feel free to share this article on social media like Facebook, LinkedIn, and Quora.
If you have any remarks or personal ideas based on this article’s topic, don’t hesitate to leave a comment in the section below this page, and we’ll give you a response.
Do You Want More To Read?
- How to Reset Windows 11 PC to Factory Settings | All You Need to Know
- How to Fix Bluetooth Device Missing from Device Manager | Possible Steps to Apply
- How to Set Up Any Printer on Windows 11 PC | Manual Printer Installation
- How to Block People Off Your Wi-Fi Network Via Wi-Fi Deauthorization Attack