
Within the year 2017, Windows Movie Maker was officially discontinued and replaced with Video Editor, which was formerly known as Microsoft Story Remix.
If you’re making use of an old PC running Windows 8 or 7, you should still have the Movie Maker installed on your PC.
If you’re using the Windows OS, and miss the feature of the Movie Maker, you can still download an older version via the Way Back Machine.
In today’s article, we will teach you how to download Windows Movie Maker if it’s not installed on your PC and also shows you how you can use the app to edit videos on your PC.
There are 6 methods we will look into in this article, and find out how you can download Windows Movie Maker on any PC.
Method 1: How to Download Windows Movie Maker
1. Download the Windows Live Essentials Setup File: If you’re using Windows 10, you can download an old official copy of Windows Live Essentials, which includes Windows Movie Maker from an archived version of Microsoft’s website.
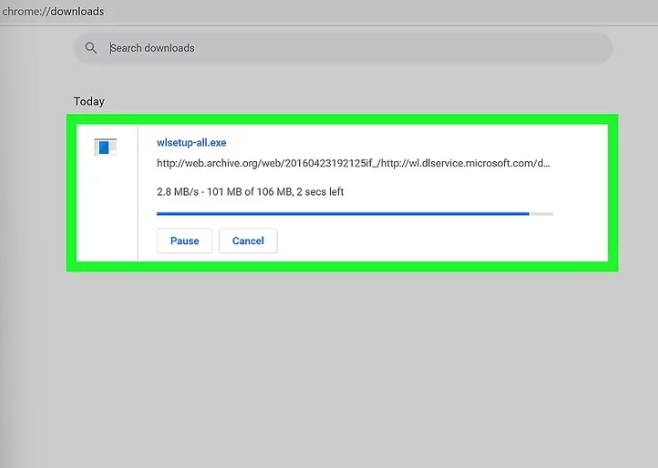
Visit the Windows Live Essentials download page to prompt the WLE setup file to start downloading.
- This page is vastly blank and may take some seconds to a minute before the file starts downloading.
- Similarly, you can use Video Editor, which is pre-installed on Windows 10 and 11. This is the replacement for Windows Movie Maker. To launch the Video Editor, simply click the Windows Start Menu and type “Video Editor”. Then click Video Editor to open it.
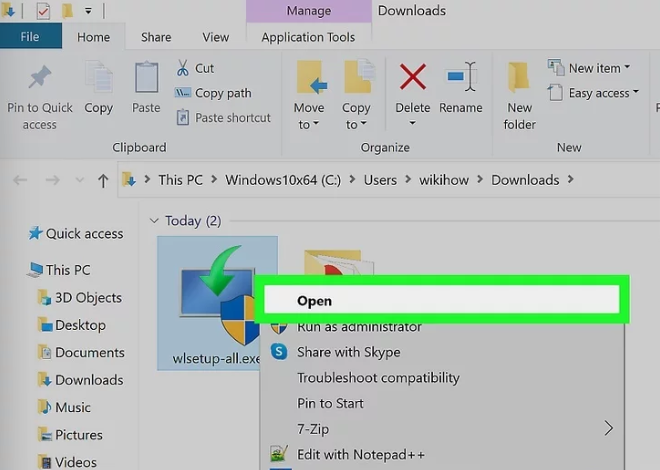
2. Open the Setup File: Double-click the wlsetup-all.exe file in your PC’s default download location to access it. By default, you can access the file in your Web browser or Downloads folder.
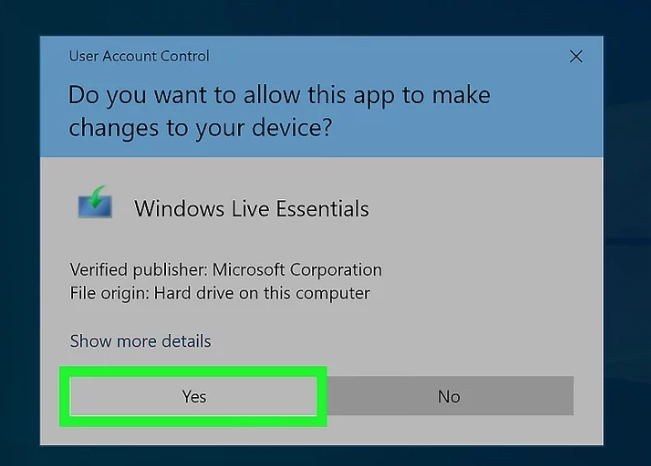
3. Click “Yes” when prompted: This enables the Windows Movie Maker setup file to change your PC.
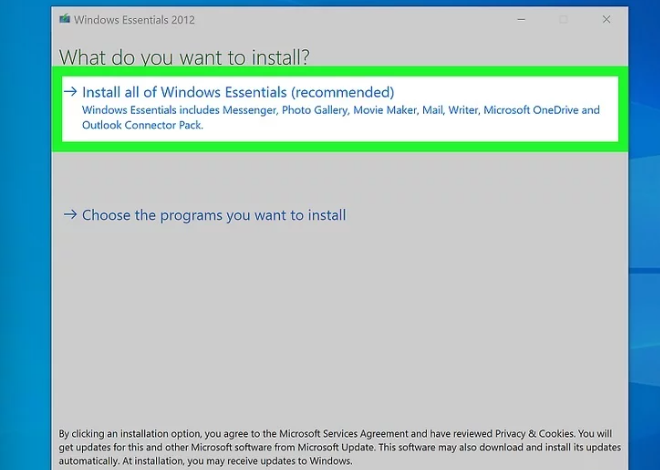
4. Click “Install all of Windows Essentials (recommended)”: You’ll find the option at the top of the page. Most Windows Essentials programs are not compatible with Windows 10, Still, you can install Windows Movie Maker by clicking this option.
- Similarly, if you want to install Windows Movie Maker, simply click Choose the programs you want to install and uncheck all applications, except for Photo Gallery and Movie Maker. Then click on the Install option.
- If you eventually get an error message saying the software could not be installed, continue to check if it was still installed. If not, click the setup file all over and repeat the same process.
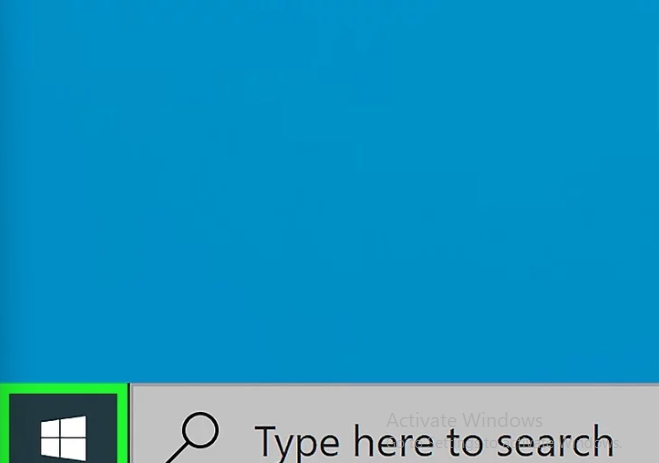
5. Open Start: Here’s the icon that has the Windows logo. Find it in the lower-left corner of Windows 10, and the first icon at the center of the taskbar below on Windows 11.
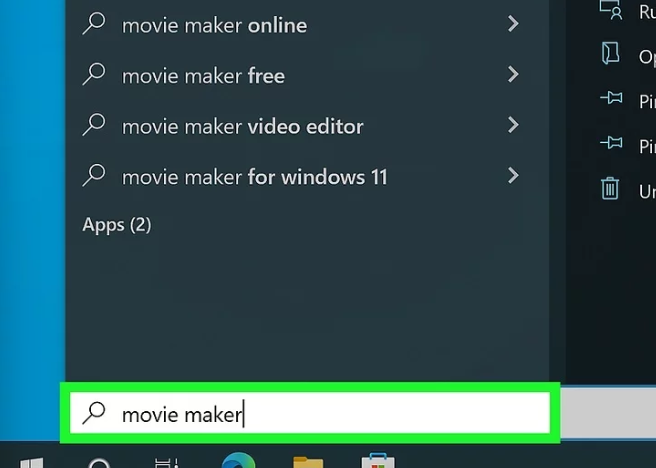
6. Type in windows movie maker: This will search your PC for the currently installed Windows Movie Maker app.
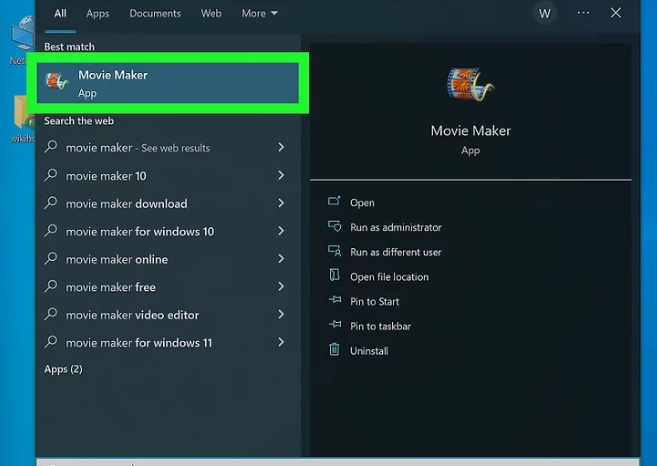
7. Click Movie Maker: It has a film reel icon. You can find it at the top of the Start menu. This will prompt the Windows Essentials terms of use window to launch.
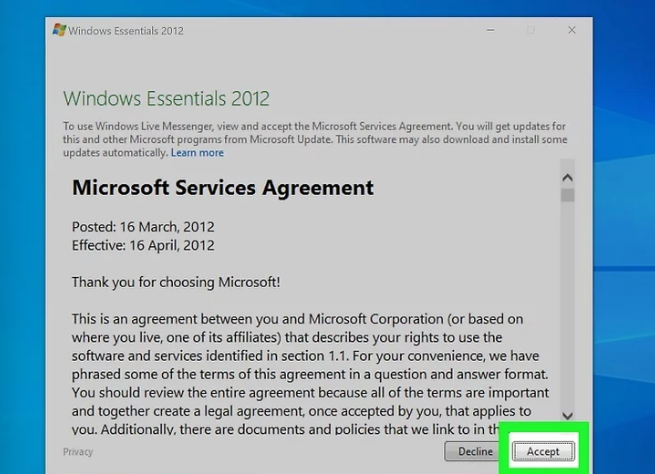
8. Click Accept: This option can be seen at the bottom-right corner of the window. Movie Maker should launch after clicking it.

9. Close the Windows Essentials Installation: When the installation window pops up with an error message, just click Close and confirm the decision when prompted. Then you can proceed with using Windows Movie Maker.
Method 2: Adding Videos & Media
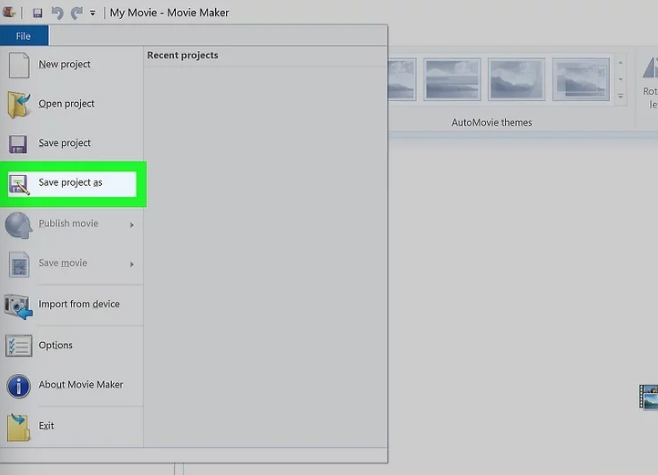
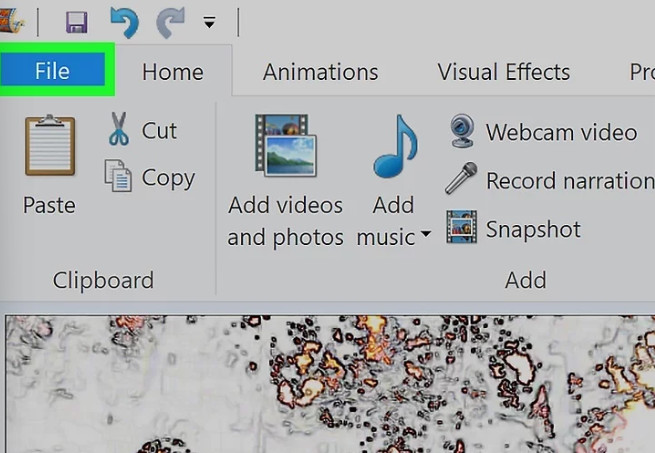
1. Save your New Project: A new project will be created automatically when you open Windows Movie Maker, Go ahead and save your new project. To do so, click File in the menu bar at the top, and then click Save Project as in the drop-down menu.
Enter a name for your project, and choose a destination folder on the left side of the desktop. Then click on Save.
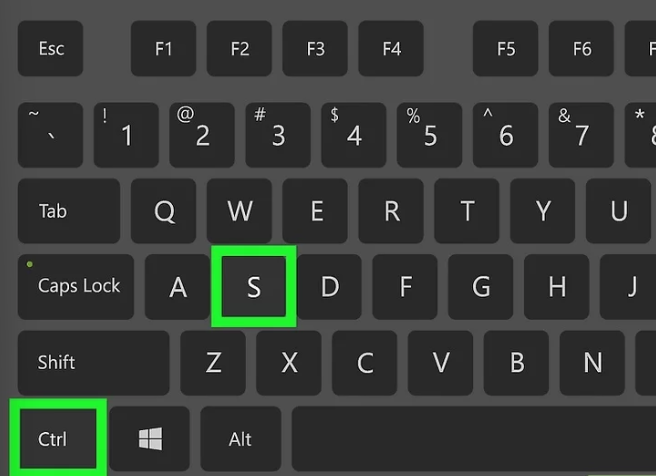
- At any point in the creation process, you can save your progress by pressing Ctrl + S.
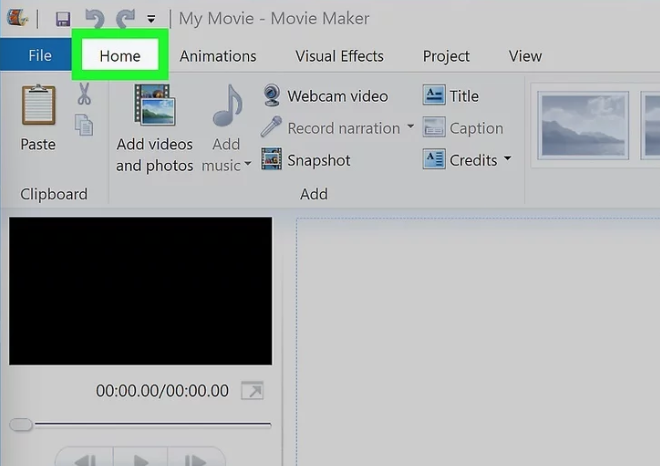
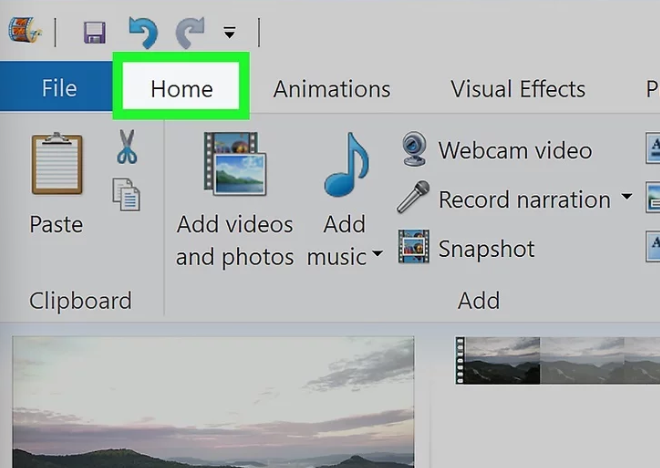
2. Click the “Home” tab: It’s the second tab in the menu bar at the top of Windows Movie Maker.
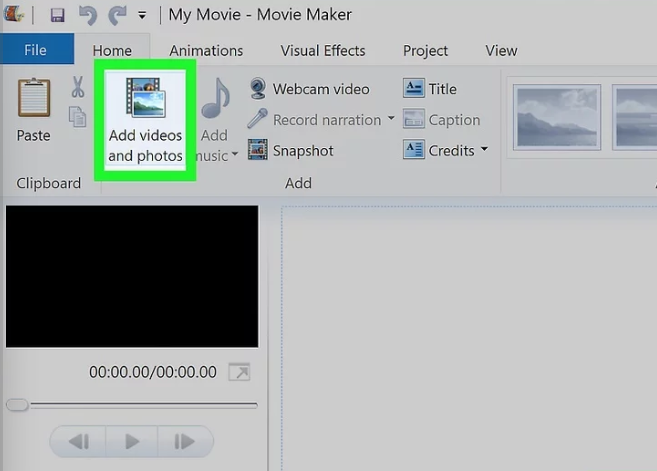
3. Click Add videos and photos: It’s the first icon in the menu bar at the top. it has an icon that looks like a photograph and a filmstrip.
- You can also right-click the large “Project” window and then click Add videos and photos in the drop-down menu.
- If you want to record a video using your webcam, click Webcam video and click OK to start recording a video with your webcam.
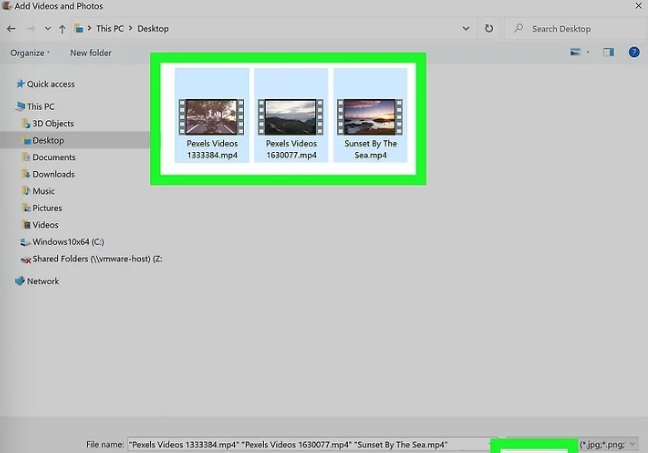
4. Select photos or videos: To do this, go to the video or image files you want to add to your project. Click a file to select it. Hold Ctrl and click to select multiple files. Then click Open to add the video files to your Project window.
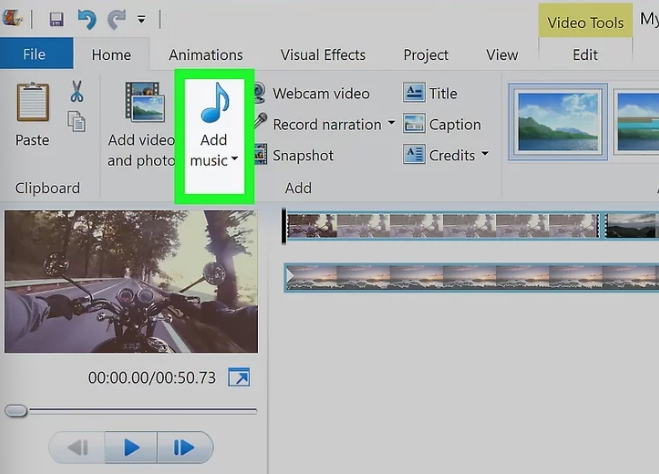
5. Click Music: It’s the second icon in the menu bar at the top under the “Home” tab. It has an icon that looks like a musical note. Click this icon to choose music for your project.
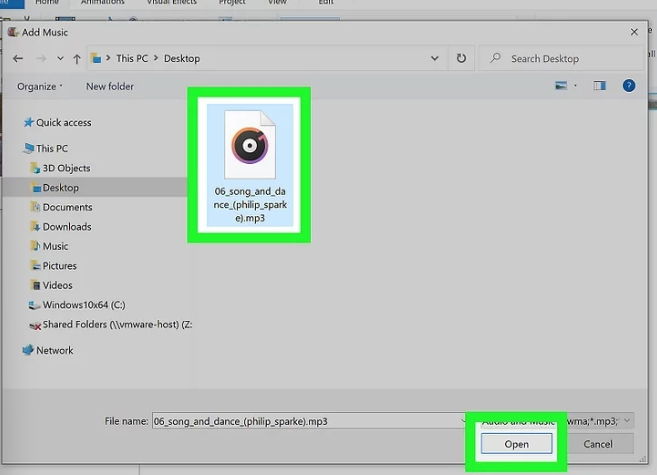
6. Choose the music you want to add: To do so, go to the folder that has MP3 or audio files. Click and audio file you want to add and click Open.
- Alternatively, if you want to record a narration for your project, click Record narration to record narration with your microphone.
Read Also: How to Create Windows 11 Bootable USB Drive on PC or Mac
Method 3: Organizing and Editing
1. Determine a file order: Review your project files and decide which one would go first, second, and so on. You should also figure out where you want the music to start.
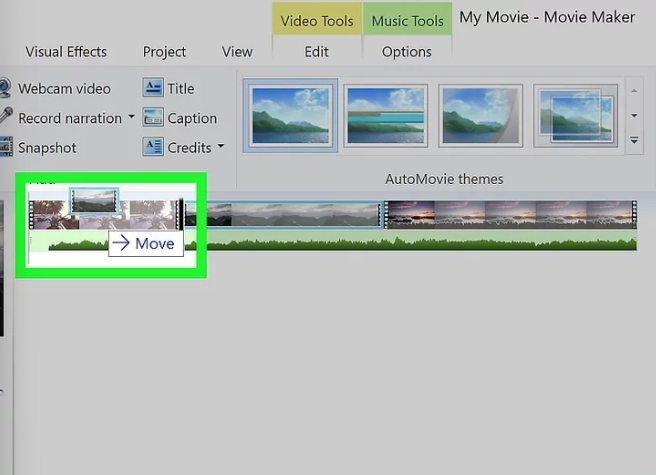
2. Re-order your files: Click and drag the file that you want to use at the start of the video to the top-left corner of the “project” window to anchor it there. Then drag the next-up file over and drop it to the right of the first file.
- You should see a vertical line appear between the two files. This shows that if you release the mouse button, the files will snap altogether.

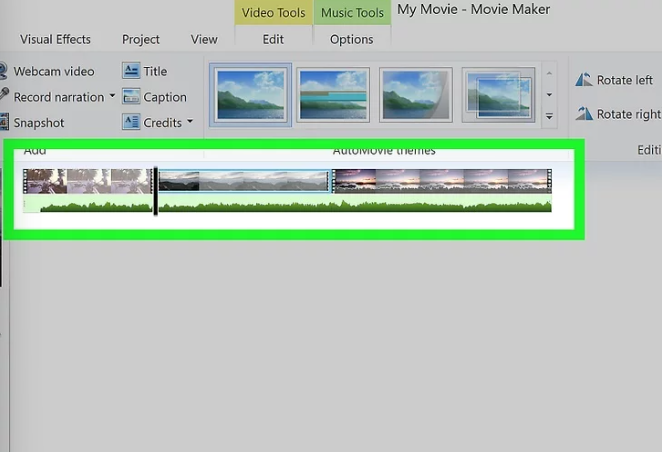
3. Position the music: Click the green music bar, which is found below the video files in the Project window, and drag it to the left or right. Then release it to reposition.
- Note that the end of the music will lock the end of the last video or image if the combined length of the files doesn’t add up to the music’s playtime.
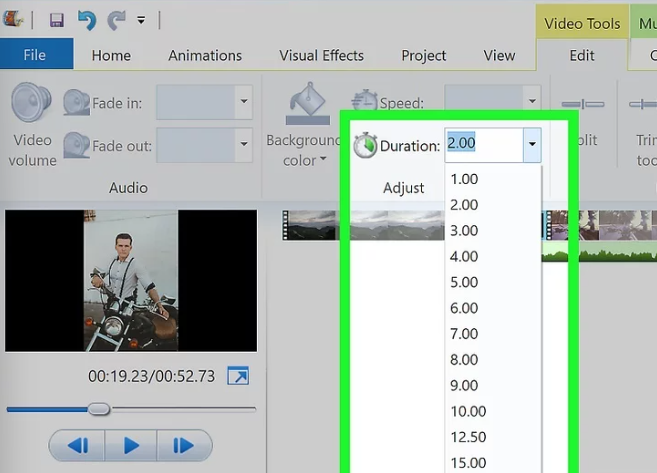
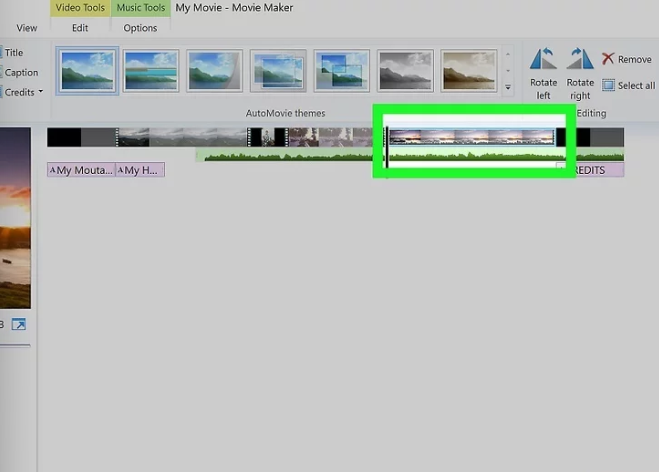
4. Edit an image’s duration: Double-click an image to open its properties in the toolbar at the top of the window. Then use one of the following options to set how long you want an image to display in your video project:
- Duration: Click the Duration text box, then type in the number of seconds you want an image to display.
- End Point: Click and drag the black vertical bar in the Project window to a section in the photo or video where you want to remove the photo or video and move on to the next one. Then click Set end point in the properties panel at the top.
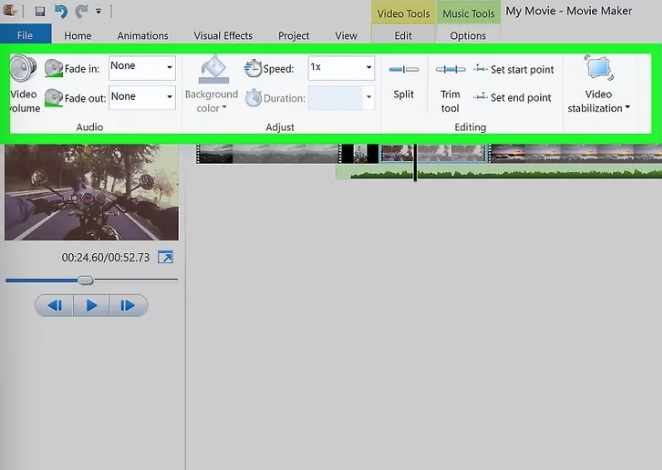
5. Edit a video’s properties: Double-click a video in the Project window to open its properties in the toolbar. Then change any of the following options in the properties panel at the top:
- Volume: Click Video volume on the far left side of the Properties panel. Then click and drag the volume slider left or right to adjust the audio volume.
- Fade In/Fade Out: A fade-in is when the audio gently raises from silence at the start of a click, while a fade-out happens when the audio gently lowers to silence at the end. Then, to add a fade-in or fade-out, simply click the “Fade in” or “Fade Out” box, then select Slow, Medium, or Fast to choose the speed of the fade-in or fade-out.
- Speed: Here enables you to speed up or slow down a video. Click the “Speed” drop-down box, then choose a video speed. Also, you can enter a custom speed. 1x is the normal speed, while anything below it will slow down the video, and anything above it will speed up the video.
- Trim: This enables you to select parts of a video you want to use and cut out parts you don’t want to use. Click Trim Tool in the menu bar at the top. Then click and drag the slider on the left below the video preview to where you want the video to start. After that, click and drag the slider bar on the right to where you want the video to end. Then click Save Trim.
- Split: This cuts a video clip into two different clips. Drag the vertical side in the large Project window to where you need to split a clip. Then click Split in the menu bar at the top to split the clip.
- Stabilization: This enables you to correct a shaky or wobbly video. To do this, you need to click Video stabilization, then choose Anti-shake and wobble correction – low or Anti-shake and wobble correction – high.

6. Edit the Music’s Properties: Double-click the gree music bar below a video or photo in the project window. Then customize any of the following options in the toolbar at the top to edit the music:
- Volume: Click Music volume. Then click and drag the volume slider left or right to adjust the music volume.
- Fade In/Fade Out: A fade-in is when the audio gently raises from silence at the start of a click, while a fade-out happens when the audio gently lowers to silence at the end. Then, to add a fade-in or fade-out, simply click the “Fade in” or “Fade Out” box, then select Slow, Medium, or Fast to choose the speed of the fade-in or fade-out.
- Start Time: This adjusts the time in seconds when the music begins to play relative to the length of your entire project. Type the time when you want the audio to start in your project. Also, you can adjust this by clicking and dragging the green audio bar in the Project window.
- Start Point: Here, it adjusts the time in seconds when the audio file begins to play relative to the music file. This trims time off the beginning of the audio file. Enter the time when the section of the audio you want to use begins.
- End Point: This organizes the time in seconds when the audio file ends. And it trims time off the end of the audio file. Enter the time when you want the section of the audio to stop.
Read Also: Windows PC Shuts Down Randomly | 8 Things to Check & Fix the Issue
Method 4: Adding Titles and Text
1. Click the “Home” tab: You’ll find the tab on the upper-left side of the window. This will take you back to the editing toolbar instantly.
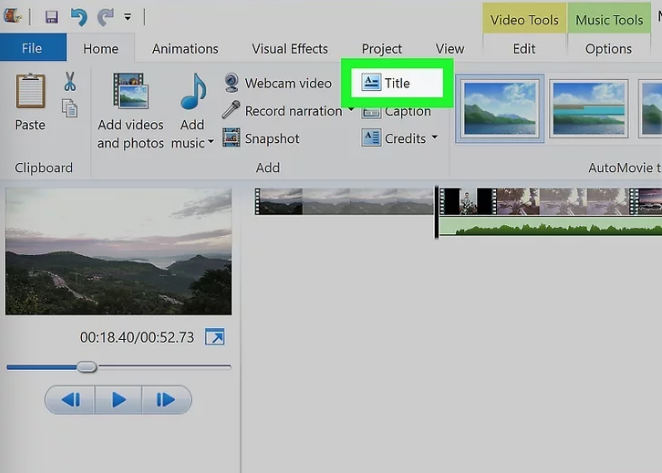
2. Click the “Title” button: You’ll find this option in the “Add” section of the Home toolbar. This will add a new title at the beginning of the video. You can customize the project by clicking and dragging it.

3. Enter title text: In the text box that appears on the video preview window, type in the title that you want to assign to your content title.
- Also, you can edit the title slide’s length in the “Adjust” section of the toolbar when you click the text box close to “Duration” and type in the time in seconds, that you’d like it to last.
- If you want to also customize the size, font, or formatting, you can do this in the “Font” section of the toolbar.
- To customize the background of the title, click Background color in the menu bar at the top, and then click one of the colored swatches.
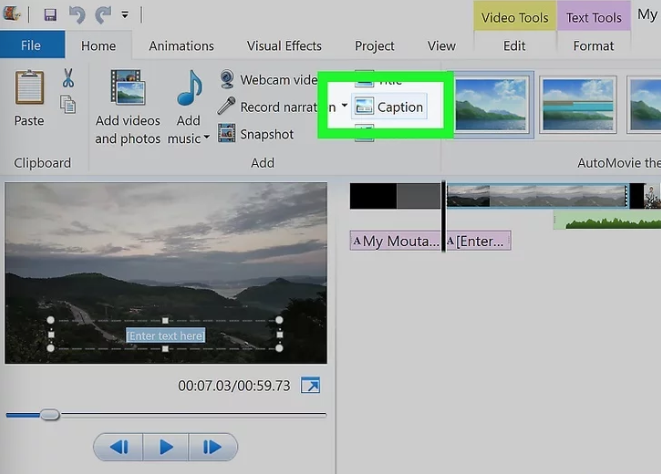
4. Insert captions to your video project: To insert captions to your video, click and drag the vertical black line in the project window to where you want to add a caption. Then click Caption below the “Home” tab. Now type what you want the caption to convey.
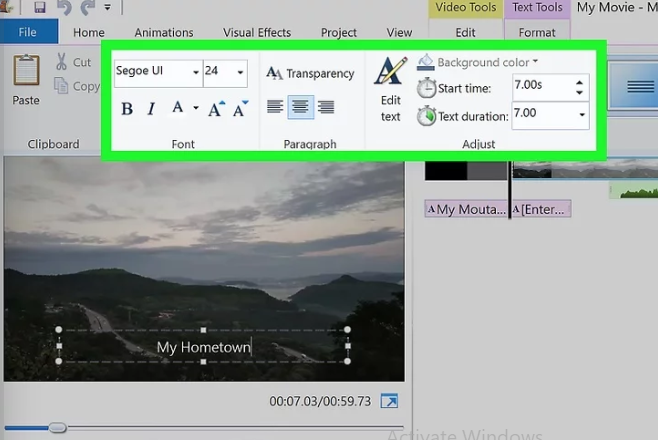
5. Edit the Caption: To edit the caption, simply double-click the pink caption box under your video clip in the Project window. Then use the following options to edit the caption:
- Font: use the options in the box above “Font” to choose the font you want to use, font size, and style. Then use the options in the box above “Paragraph” to choose the text alignment and the text transparency.
- Edit Text: If you need to edit the text, click Edit text or double-click the text in the video preview. Then use the keyboard to edit the text.
- Start Time: This sets the time in your project that the caption starts displaying. Enter the time in seconds for where you want the caption to start showing. Also, you can click and drag the pink caption box in the Project window to adjust when the caption begins.
- Text Duration: use the box next to “Time duration” to type the time in seconds you want the caption to remain on-screen.
- Effects: Use the options in the “Effects” section in the menu bar at the top to select a text animation for your caption. Hover over one of the options to preview it. Click it to apply the effect.
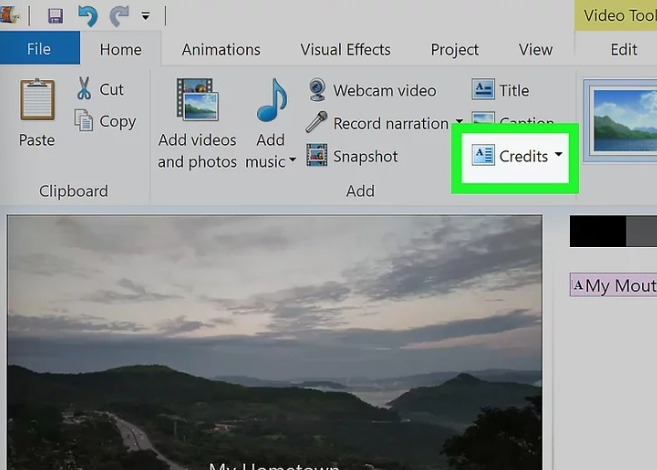
6. Add Credits: To add credits, click Credits under the Home tab to add a new video clip for credits at the end of the clip. Then type your credits.
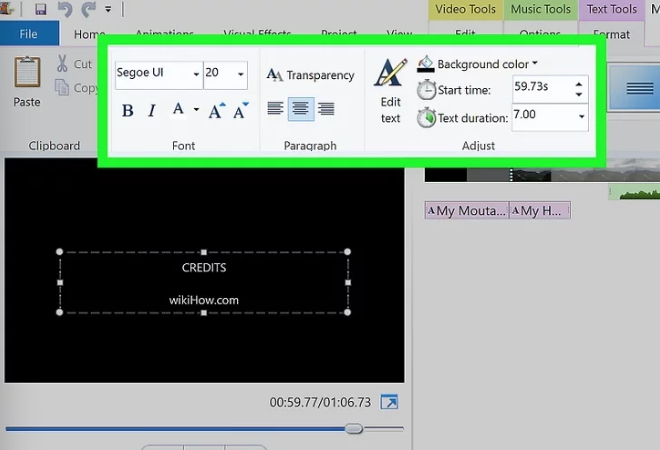
7. Edit your Credits: To edit your credit, double-click the credits video clip at the end of your movie. Then use one of the following tips to edit your credits:
- Edit the text: To edit your credits, double-click the pink bar below the credits clip. Then use the keyboard to edit the text.
- Background color: To change the background color of your credits, click Background Color in the menu bar at the top. Then click one of the colored swatches to pick a background color.
- Duration: To edit the time duration of the credits, use the box next to “Duration” to enter how long in seconds you want the credit to stay on.
Read Also: The Best Windows Keyboard Shortcuts in 2024 | Screenshots & Text Manipulation
Method 5: Adding Effects and Transitions
1. Click the clip you want to add an effect or transition to: Click on any clip in the Project window to
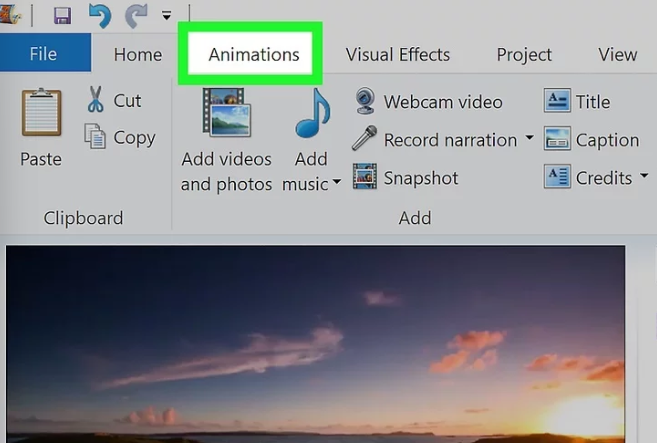
2. Click the “Animation” button tab: It’s the third tab in the menu bar at the top.
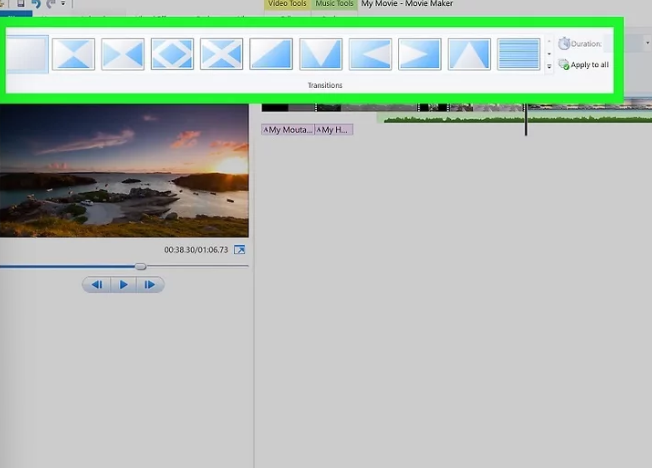
3. Add a transition: Transitions are visual effects that happen at the beginning and/or end of a video clip.
There are a variety of transitions in the “Transitions” section in the menu bar Use the arrow buttons on the side of the section to scroll through all the transitions. Hover over a transition to preview it. Then double-click it to apply it to the video clip.
- To adjust the period of the transition, type in the time in seconds close to Duration to the right of the Transitions box.
- Also, you can click Apply to All, which is on the right side of the Transitions section to apply the transition to all video clips in your project.
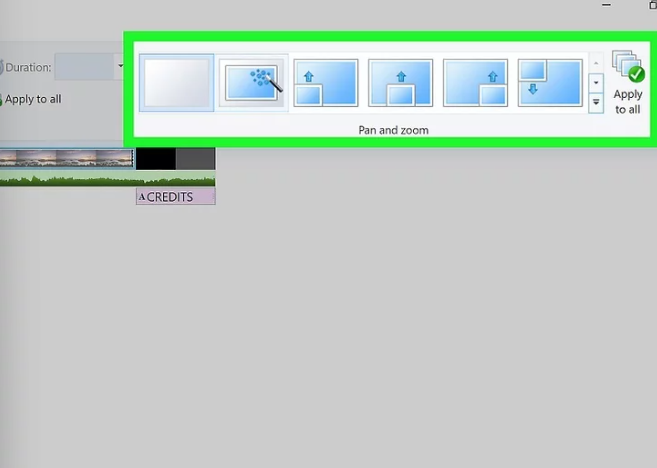
4. Add a pan and zoom effect: Pan and zoom effects are useful on still images. The camera will either scroll over the image or zoom in on it. To add a pan and zoom effect, simply click an image or video clip in your Project window.
Hover over one of the effects in the “Pan and Zoom” section to preview the effect. Click on it to apply the effect.
- Click Apply to All to the right of the “Pan and Zoom” section to apply the effect to all videos and images in your project.
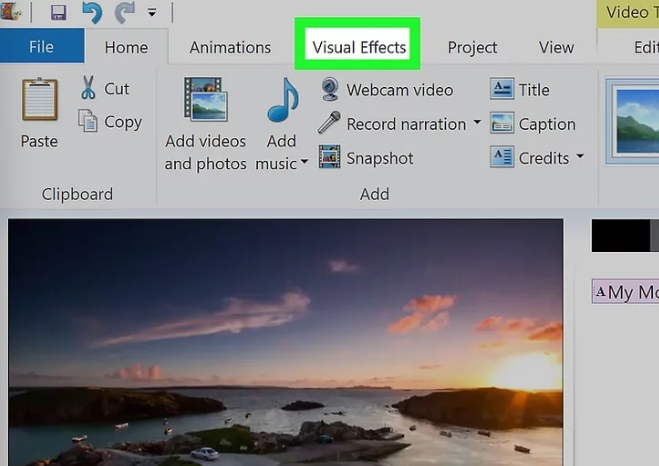
5. Click the “Visual Effects” tab: It’s the fourth tab at the top of the page.
6. Click the video clip you want to apply a visual effect to: You can click any image or video clip in your Project window.

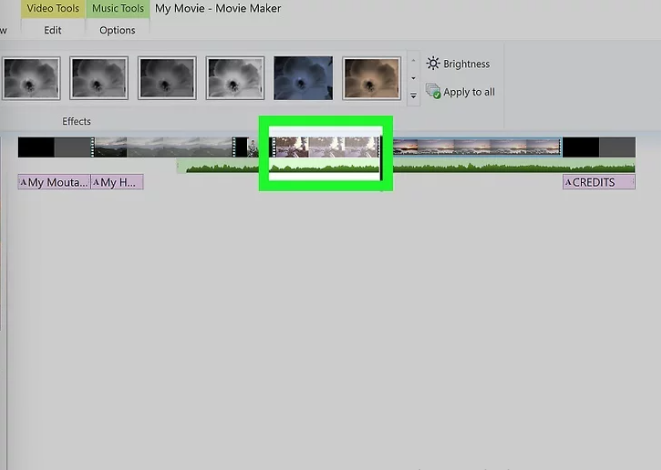
7. Add a visual effect: Visual effects allow you to change the color and look of a clip. You can make it black and white, or sepia, or apply other colors and visual effects.
Hover over an effect in the “Effects” section to preview the effect. Use the arrow keys next to the section to scroll through all the effects. Click and effect to apply it.
- Click Apply to All to the right of the box to apply the effect to all clips and images in your Project.
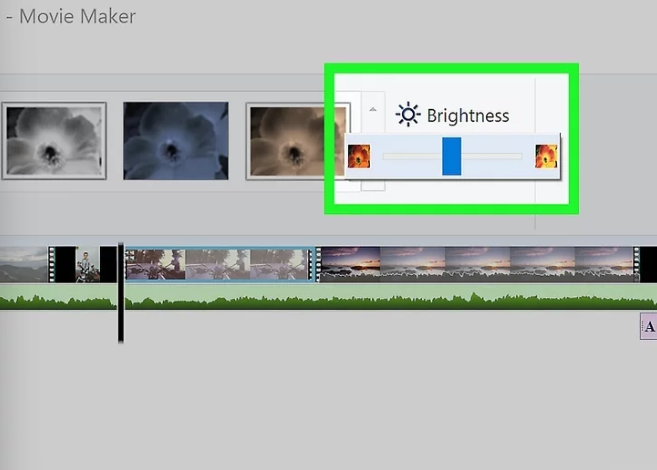
8. Adjust the clip brightness: If you want to adjust the brightness of a clip, click Brightness next to the “Effects” box. Then use the slider bar to adjust the brightness of the clip.
Read Also: How to Reset Windows 11 PC to Factory Settings | All You Need Know
Method 6: Saving the Movie
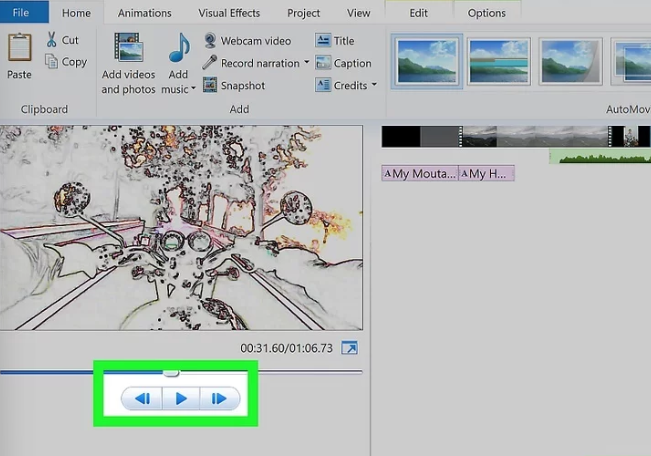
1. Preview your Movie: Click the “Play” button below the movie preview window on the left side of the window. If your movie looks the way you want it to, you’re ready to save the movie.
2. Press Ctrl + S to save your project: Similarly, you can click File, then Save the project to save your project.
3. Click the File option: It’s in the menu bar at the top.
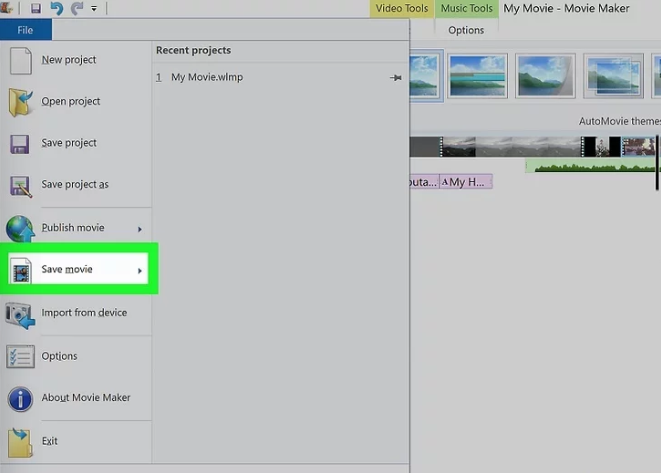
4. Click the “Save Movie” option: You can find this option about halfway down the File menu. This displays a variety of formats you want to save the movie in.
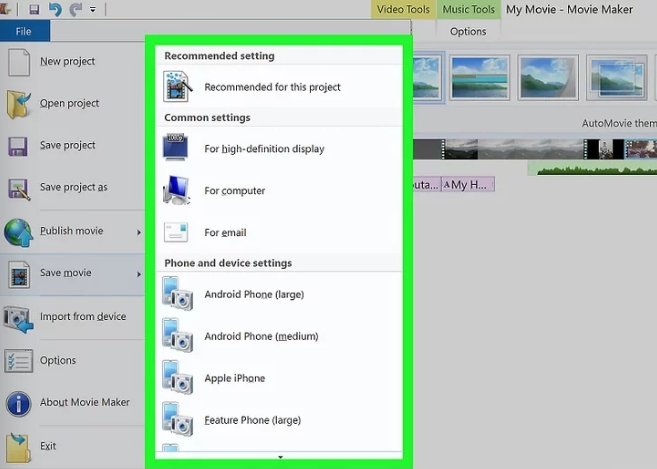
5. Select a save type: If you don’t know what format you would use, simply click Recommended for this project at the top of the drop-down menu, or, you can click the format that you want to use.
- You can choose the best format for different devices, including large, medium, and small Android phones, iPhones, tablets, computers, email, and more.
- Similarly, you can click Publish Movie and publish the movie directly to a social media application like YouTube, Facebook, or even Twitter.

6. Enter a name for your movie: Type in the name that you want to use for the movie file itself.

7. Choose a save folder: On the left side of the window, click a folder in which you want to save the movie file.
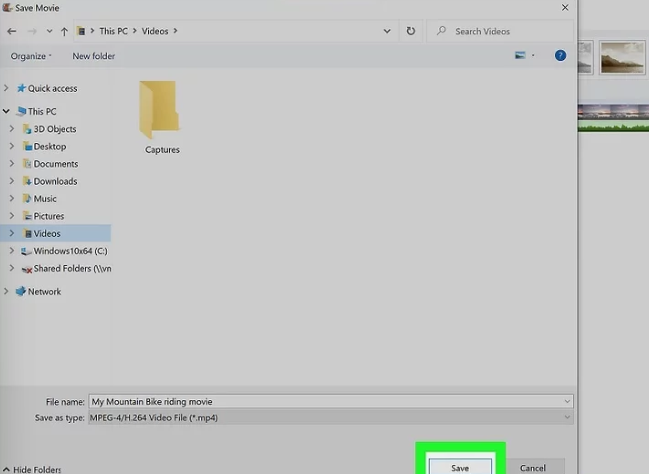
8. Click the “Save” button: You can find the Save button near the bottom-right corner of the window. This will save your movie file and start exporting your project. Take your time, exporting can take a long time to process, specifically for a detailed report.
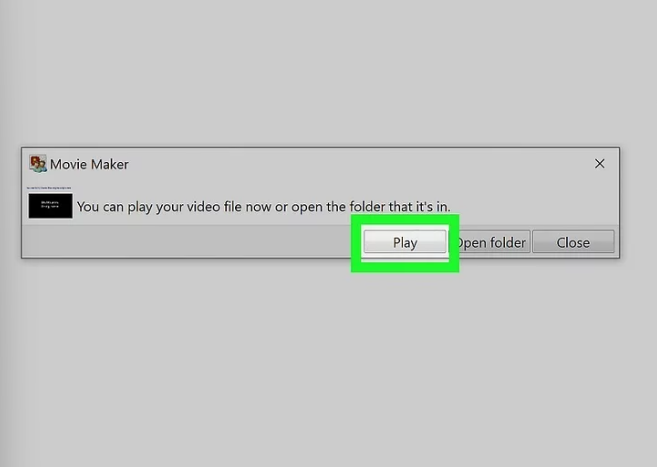
9. Click the “Play” option when prompted: When you click the Play button, it will play your movie in your PC’s default video player.